
Well hello there! I am feeling accomplished for us today because we have actually finished three projects this past week. By far my favorite is a reclaimed wood media cabinet. This is a project for my daughter’s coworker and friend. The fact that Mr. Math is driving out to Charlotte next week really helped with the whole get it finished process. My daughter’s friend sent me a link to this amazing piece from Pottery Barn and said she wanted something like this. I had to be honest with her. We are working off our suburban back porch right now with most of our tool stored until the big move in less than a month. No way could we make beveled cabinet doors. She was fine with a more rustic look. I also told her we would be using reclaimed cedar so the color would be different. She was fine with that. Finally, I told her that we would be carrying it in the back of our truck so the length had to be no more than 60 inches. Unbelievably, she was fine with that, too. 

Her timing was perfect. There was a pile of reclaimed cedar that Mr. Math Had decreed was too nasty to store then move to our new digs. It was making me crazy(er) to see this burn pile. Mr. Math tried to burn it but our recent rains meant he couldn’t get the pile to light. (Yay!)

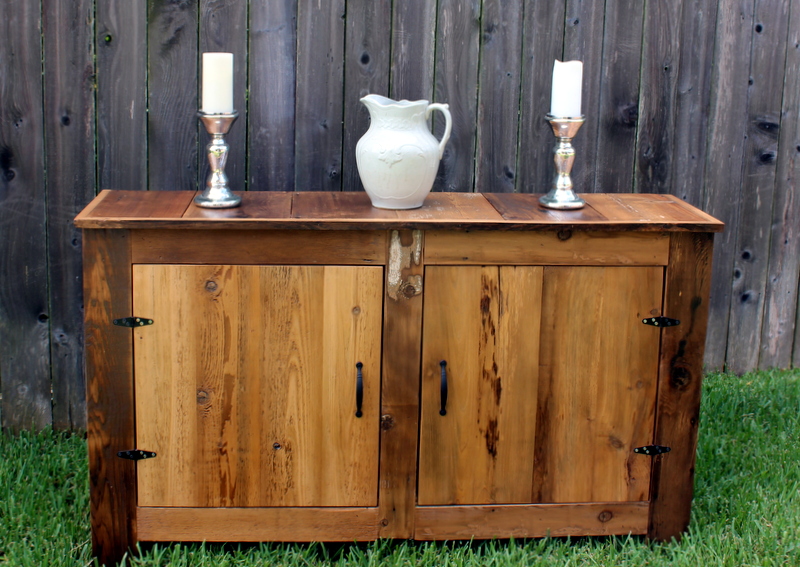
I was very, very excited to be able to go save some of it for this project. A few of the boards even had scorch marks from the attempted fire. I put those boards in strategic locations so they could be most visible.

The plan was fairly simple. Mr. Math built a skeleton for the project out of new 2X4’s. I sanded, and sanded, then sanded some more on the boards. Many of these boards had been painted when they were on our lake house or my friend’s who gave me a load of the wood when they added on to their house. I sanded through the layers of paint but did not remove it all. I love how the layers of paint provide a sense of history and rustic charm to the wood. We laid out the wood for the top, figured out what cuts needed to be made and which boards needed to be ripped down. After the top was figured out, we got the sides and front done. For the back we added hardboard. The weight of this piece was a deciding factor. Even though we had enough reclaimed wood for the back, it will never be seen and would add unnecessary weight to the piece. After the front and sides were done, we added plywood shelves inside. The doors were the last part built once we had exact measurements of the openings. 


 I love the look of the wood.
  When you polyurethane the wood, the color depens and it become richer. We
 The interior is painted a light cream color. Mr. Math picked the color because he said it would be easier to find things in the cabinet.


We love the look and are excited to get it to the new owners.
Thanks for taking the time to read my post. I appreciate each and every one of you.
Blessings,
Karen


Leave a Reply