Behr Paint with Primer, Coldspring, curb appeal, Texas

Operation Courtyard (Part 1)

Our cottage is so stinkin’ cute.

She is a beauty. I am happy with everything about the house except one area. The area is in front of the house and…well…that space is another story. When I sit in the rocker and face south this is what I see:

It is a beautiful view even in this dry season.

When I sit on the swing which faces north, this is my view.

It was way worse until we got it cleaned up. I think of that space as a courtyard for the cottage but it was a catch-all space for years.

In case you are wondering yes those are train cars that are pulled behind a lawnmower. Mr. Math has the whole outfit to go along with it.

We live on a property that has been lived on for a long time by people who reuse everything and spend money as a last resort. They are my people!

I wonder how long ago this wheel was attached to the tree to hold water hoses? We are still using it and unless the tree dies it will still be there when we move on years from now.

The tool shed that is front and center in the space is a perfect example of the ingenuity of those who made our property so great. The shed is made from recycled heavy corrugated metal sheets tack welded together. It has some rusted panels and was painted silver at one point. It is not something that we can just replace parts on because it is basically all one piece. It holds things like chemicals and fuel we wouldn’t want in our shops so we need it. It would be a pain to move it so our options are limited.

The wall of the garages isn’t much better. It was owner built, added on to, windows were removed, there is mold along the bottom, and electrical was changed along the way. It isn’t something you want to look at all the time.

Because I think everything looks better painted, the first thing I knocked out was a cleaning and paint job on the garden shed. Primer first of course.

Even the primer coat looks better than the rusty metal.

I painted the shed the same color as the trim of the cottage, Behr Dove. as soon as it was painted I tackled a sign for the building. Mr. Math who is a wizard with concrete board cut out a circle from left over concrete backer board. I started looking at forest/country/tree quotes. When I found this one it fit perfectly. My whole life I lived literally a fourth of a mile from I-10 in a city where I could walk to a shopping center. I never thought I would enjoy much less find the peace I have found here in the trees.

I decided to hand letter and paint the sign because I wanted a folksy look. You can’t take a painting hung on a tool shed too seriously.

Mr. Math also added an old window to the back side that was sitting in my shop after giving it two coats of polyurethane.

It looks so much better painted. Total cost for the shed was a few dollars in bolts to connect the sign and window. Everything else was left over from building the cottage or other projects.

I still have a lot to do but I am excited about my plans.

I am going to have to look for some plants and nice planters. This was so I could see how it could look.

Thank you for following along on our journey.

We love to hear from you,

Karen

Behr Paint with Primer, Building a Home, Coldspring, guest house, Repurposed Furniture

The Guest House Porch

We spend a lot of time outside and porches are important to us. It shouldn’t be a surprise that the guest house has a little porch to welcome guests. The original building had a sort of porch but we took out the original slab and reconfigured the space. We now have an eight foot by twelve foot porch that is blocked by the north wind and rain we get in the winter but open to the prevailing southern summer breezes. It has a great view of the garden and down the road will have a nice front view. I have plans.

The porch ceiling isn’t finished yet ( or the top section of the house caulk and paint) but we are still moving forward.

Our future plans for the porch are to put in a shiplap ceiling painted haint blue, cover the front posts and beams with cedar, and possibly do something with the concrete slab.

I am excited to say that the house got a coat of Behr True Taupewood, it is a gray with brown undertones. The trim is almost done and is painted Behr Dove. It is going to look beautiful with the door, swing, and cedar trim.

Speaking of swing, my goodness this four foot cypress beauty is a show stopper. A friend makes swings and other items in his shop. I love that it was custom made for us, It is stained a cedar stain and has three coats of Spar Urethane so that it can hold up to the weather.

We also have an Adirondack style rocking chair that was literally salvaged from the trash and rebuilt by Mr. Math. It got a good coat of black spray paint and has a place on the porch.

On top of the finishing up we need to do, I also want to make a barn quilt for the blank wall by the door. The view from the swing is just a blank wall and this house is all about quilts.

I found this pattern https://newlywoodwards.com/how-to-make-a-diy-barn-quilt/
I like how simple it is.

The Behr App has a project tab where you can save colors and look at how they go together.

All of the paint is in my shop right now so the 36 x 36 inch plywood is all that is needed.

We are making great progress now and it feels like we are getting somewhere finally. I am so thankful for all the work my husband has put in to get here.

Thanks for following along on our journey.

Blessings,

Karen

Behr Paint with Primer, Building a Home, Coldspring, painting

Finally an Update on the Guest Cottage

Hello friends. It has been a while since I let you all know what was going on with the guest cottage. Remember what Thumper’s mother told him? “If you can’t say something nice, don’t say anything at all,”. We went through a period where there wasn’t a lot to say that was nice. Since I last updated you, it rained, every day for over a month. Every. Single. Day. Then, our contractor flaked on us only to come back and do the worst job possible on our Sheetrock.

I have seriously cried more tears over this silly 486 square foot building than any other remodel we have done. Even our rent house that the city of Huntsville had tagged as uninhabitable.

Soooo, that is why I haven’t had a lot to say but finally we are back on track and moving forward.

First of all, what hasn’t changed since my last update. The exterior hasn’t been touched.

Still looks just like this. No caulk or paint.

What has happened since I checked in last, is the interior and the front door.

The front door had to come out completely and get reinstalled before the doorknob could be put in but thanks to my sister in law’s boyfriend coming to help out Mr. Math but now it works great and gives me a lot of joy. I love that reclaimed door and it makes me happy.

From the inside this morning.

Also, after the terrible Sheetrock job got some love from the hubby, okay, lots of hard work not love but the Sheetrock messes are mostly fixed, we got the ceiling and walls painted.

The Sheetrock walls were painted Helium which is a very light turquoise. It doesn’t photograph well but it is a beautiful color.

We installed v groove planks on the 12 foot tall wall. Nothing about the cottage is plumb, square or level so installing horizontal planks was a challenge. My husband purchased a laser level that made our life so much easier. I am thrilled with how it turned out. One of the smartest things I did was to paint the planks before nailing them up. Being able to paint the grooves while it was laying flat and I was standing on the ground made the process so much easier! Soon I will show you the whole beautiful wall.

The bathroom has been painted. Well, the part that will have paint. The tile isn’t up yet but upcoming.

Canned lights, ceiling fan, and bathroom lights have been installed along with our split unit air conditioner.

There are electrical problems that will be fixed this week but the ac is functional right now which made working inside the building bearable in July.

Finally, I found someone to refinish the claw foot tub and sink for the house and they look amazing.

More to come. I have lots to say now that we are driving the bus on the remodel and lots to celebrate.

Looking forward to sharing our adventure.

Blessings,

Karen

Behr Paint with Primer, Coldspring, JJ Lane, painting

Exterior Doors and Paint

Our house is pretty dark inside due to the low ceilings, tinted windows, and shade trees. We have done what we could to add light by adding canned lights to the ceiling, installed blinds that open, and painting the cabinetry white. Our newest project has also made a big difference. We have added glass doors to all the exterior doors.

Our front door is my absolute favorite. It is solid mahogany with beveled glass in 3/4 the door. It bends so well with the cedar trim. We purchased the door at the Door Clearance Center in Houston.

The door that was here before was solid steel. On the outside. On the inside of the house the door had been completely sealed off with Sheetrock in order to have space for a china cabinet. The door was completely sealed so it wouldn’t open until we expanded the front porch. We replaced the front door when we added on to the front porch.

As we worked on the back porch, we decided to change out the storm door/ half glass door that leads to the back. The storm door allowed for sunlight to come in when it was open but was a pain when we were bringing things in and out for grilling and eating. The half door just didn’t provide enough light.

We decided to put in steel doors at both the back door and off the carport with full glass and mini blinds between the glass panes that we bought at Home Outlet. By shopping around for doors we saved a ton of money.

Let me tell you that putting in doors is not for sissies. Mr. Math removed the door, brick moulding, door facing, and door frame because the hinges and door locks would not have ones up. That was a lot of work but not super stressful. The putting the new door in requires a bit of skill and can’t be done alone. If you don’t have help and some construction experience hire this out. The door to the backyard slipped when we were putting it in and hit the floor. Somehow it didn’t break the glass or bend but it did get a dent. I was so sad but Mr. Math used car Bondo to repair the dent. You can’t tell there was ever a problem now but it shook me up so bad we didn’t put the carport door in for a week.

The carport door went in easier, probably because we made all the mistakes on the first door. We are thrilled with the doors an the light they add to the rooms.

We decided to paint the trim, the soffits, and doors all new colors and I am so happy for the update. The colors are all Behr. The door is Whiskey Barrel, the trim is Dove, and the siding/soffits are True Taupewood. I wanted the doors to coordinate well with the front door and the deck stain. I tried several different colors to blend with the brick I am not crazy about. My advice is to spend the money to buy samples of colors you like. The one I was positive I wanted for the siding an soffits ended up not being my favorite.

I am really happy with how it turned out. We still have some caulking, staining the cedar on the back porch, and I will be painting and stenciling the front and back porches but we are almost done. It is a good thing too. We have two more projects going on already and I am soooo excited about one of them I can’t wait to get on it. Until then, here are some pictures of the progress.

Thanks for following along on our journey. We love hearing from you.

Blessings,

Karen

Behr Paint with Primer, Coldspring, Providence Acres, recycled furniture

The Far from Perfect Patio Furniture

Hello friends from Providence Acres where I always seem to have a project going and my sweet husband does the heavy lifting. We are in the process of building a deck on the back of our house. We are adding a total of 240 square feet of semi shaded outdoor space that will connect our carport to our back porch and I cannot wait to get it finished. It has been slow going for us, but we are making steady progress in spite of lots rain, humidity, keeping up with the garden, mowing, and heat. Lots and lots of heat. We set a budget of $2000 to get the porch built and we are going to be close, but a little over. I can’t wait to show it to you but we aren’t quite ready yet. As we worked on the deck I kept thinking about a patio dining table and chairs we had out in our barn. The set was given to us by our buddies across the road. It was rough when we were given it two years ago and storing it in a barn didn’t help it get any better. When we pulled them out of the barn I had my doubts. Serious doubts.

Mr. Math had to rebuild a lot of the table underside. It is a butterfly leaf table which we had never messed with before.
Every chair needed work, some more than others.

The set was probably pretty expensive when purchased and was well used. It had been refinished at least once but probably twice. Anything wooden left exposed to sun, rain and humidity is going to deteriorate without lots of maintenance and this set was no exception. There was rotted wood, loose screws, broken boards, and general wear and tear.

After Mr. Math got it all repaired, and I learned how to use wood Bondo, I used some Behr Low Luster Porch paint the I found on the oops shelf at Home Depot for $9.00. I find the best stuff there and hang on to it until I find the right project for it. I am not sure what the problem was with the paint but it is definitely a Behr porch paint called Sea Cave.

I hand painted the chairs. Every stinking chair. It took me three days. All because I was afraid to use the airless sprayer I bought two months ago. When I came time to paint the table I knew I was never going to get the finish I wanted without using the sprayer. 2 hours of reading and two YouTube videos later, I asked Mr. Math to help me. The sprayer turned this:

All that work, both underside and top side just over an hour including wait time to turn it over. Why was I a scaredy-cat?

Just thought you might like to see some of the repairs. This set will never be mistaken for brand new, but with the paint job it doesn’t look half bad.

The set turned out better than I expected.

I found the cushions at Family Dollar for $5.00 each. They make the chairs more comfortable and add a bit of color.

All together, including the cushions, paint, screws, plates and Bondo this project cost about $40.00. Not bad for adding seating and a table. We are looking forward to having family and friends over to enjoy them.

Behr Paint with Primer, Coldspring, Painted Furniture, recycled furniture, rescuing damaged furniture, vintage style

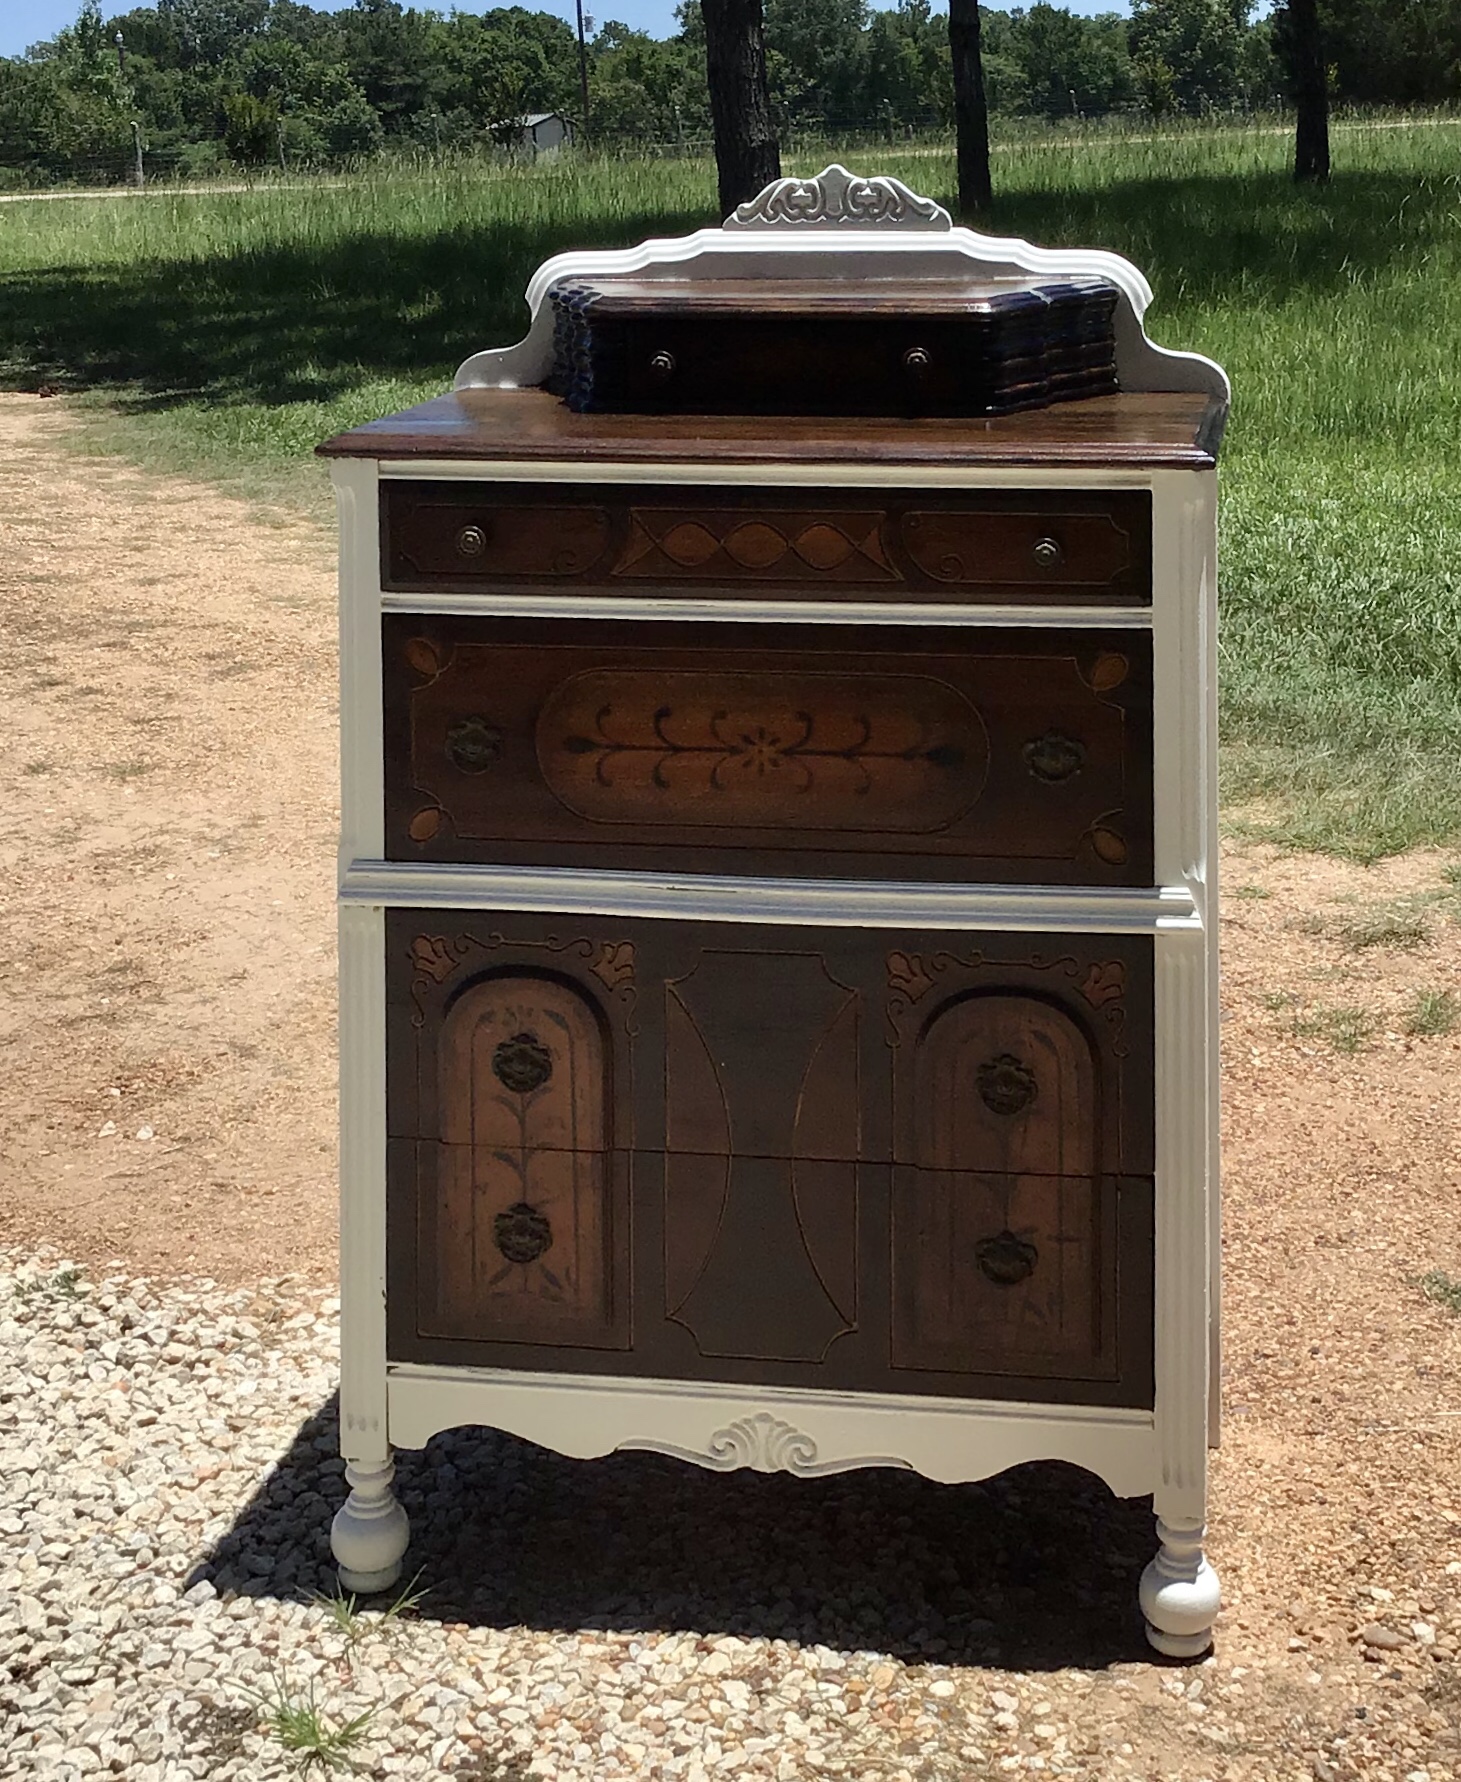
1940’s Chest of Drawers

Waaay back on December 30th Mr. Math and I headed off to collect a chest of drawers, vanity, and mirror. Somehow along the way I also picked up a lime green claw foot tub but that is a story for another day.

The furniture belonged to my friend’s grandparents and had been in a garage for 20 years and was showing what humidity can do to furniture over time. The veneer was coming off and the drawers were warped. The mirror is going to really need some attention down the road but it is a beauty. I had no idea when I picked up these pieces that shortly I would temporarily go back to work. As a principal. Then there was a pandemic. Then online learning, zoom meetings, virtual everything. The bedroom furniture got put on the back burner. I have been busy people. I promise. So the furniture moved from one garage to another.

I honestly thought that the chest of drawers would be too much work to save but that original folk art factory stenciling kept staring at me. I knew I would have to give saving at least some of it a try. I got busy stripping the veneer off. I had to get a steamer after parts of it but it came off and got sanded. I bought water based polyurethane hoping I could seal the drawers after cleaning them. The first coat was a disaster. The old varnish under the poly started bubbling up. I stopped after one coat thinking that this was all getting primed and painted. I went to bed thinking about that darn chest of drawers. The next morning I decided to try going over the bubbly varnish with steel wool and to my surprise it wasn’t horrible. It took four coats to get them looking decent. They still aren’t perfect but I am glad they were preserved. The top was totally stripped and sanded by my husband including all those wiggly grooves around the top drawer. I stained it all dark walnut

I am keeping this set for my guest room. The base of the chest of drawers was painted a warm white called cinnamon bun. I liked the original hardware patina so I kept the as is but will be spraying them with a sealer soon. I convinced my husband to stop moving it inside to take some pictures, but I still have some touch ups. I love how it turned out and look forward to having it in my home.

Behr Paint with Primer, Coldspring, DIY Projects, Ranch House Overhaul, Space Saving

A Charging Station in the Ranch House

Hello friends,  I promise you won’t be hearing from me every day but this is a project I am really enjoying already and I realized that I haven’t shared with you. Do you have a good place to get all your stuff charged? If you do, I would love to see where and how you charge all of your stuff.  Until recently we did not. It stunk. There were some things plugged in on the counter by my stove, some plugged in in our bedroom, and even the bathroom. One thing that I have discovered about an open concept home is that in order to have all that open space, you give some things up.  Things like walls to hang art on, hall closets, and other storage areas.  I love having a big open room when we are having company.  We enjoy the ability to have a pretty large group in our home for meals and entertaining so the trade off is worth it to us most of the time.

Because there isn’t much storage space, we have struggled with a place to charge everything.  We have two laptops, an iPad, an Apple watch, two phones, a Bluetooth speaker, and wireless headphones.  All of the stuff has different cords and a a tangle of wiring. I hate it. It looks awful and is always in the way. There is just something about seeing a bunch of cords and cables that wears on me. Am I alone in my neuroses? I even had my husband wrap white tap around the foot of cord that connects our television and Dish because it drove me crazy. I started looking for charging station options. (Like these here) but they just wouldn’t work for us. They just aren’t big enough for the two laptops, iPad, phones…

I also do not enjoy things being out on our counter top in our kitchen. It is a constant struggle to keep the counters cleared. Constant. Never ending.

Fortunately we had a weird space in our house that always bugged me. Always. Like since the moment we walked into the house to look at purchasing the home. There was this little niche/shelving/cabinet thing with two bottom cabinet doors, a counter then glass shelves that were adjustable. They were the problem. The peg things were slightly off from each other- like a quarter inch. That meant the shelves were all crooked, and glass, with brass brackets. It was just enough to bug me. I don’t think I have any photos of he offending shelves because I don’t generally take pictures of things that bug me.

Mr. Math fixed both problems for me with one solution. A charging station with closed cabinet doors. The doors hide all the cords, we now know where everything is- or should be- and I can actually charge every stinkin’ thing at one time now thanks to some ingenuity from the hubby.

First we ripped everything out.

It was glorious to get those shelves down and metal (uneven) brackets out. It was so glorious that I didn’t stop to take a picture for fear of losing momentum.  Once everything was down filled all the holes, and spackled the walls.

We were lucky in that there was an outlet in the kitchen that hubby could use to run electricity into our new charging station.

He installed an outlet with two usb outlets. Genius.  I have no idea how to explain electricity but here is a blog that explains how to add an outlet.  Once all the wall work was done we painted the interior with our go-to paint color Behr Moth Gray.

The next step was to add wooden, level shelves. They are basic 3/4 inch plywood cut to fit with veneer on the front.  He attached them on little rails across the back and sides. He cut a little square on the back side of the lowest shelf so that we had access to electricity on two shelves.

shelf hole

The shelves all in and the little square cut out, we bought this great surge protector.  It was a little pricey but each outlet can move around to make room if things don’t fit on the strip and it also included two usb outlets.

charging station close up

I know what you are thinking when you look at the picture above… what a mess.  You are right, it does look like a mess but all that mess is in one location and I can shut the doors! When people come over I don’t have to rush into the kitchen and grab up cords and devices.

charging station1


We now have a place for DVD’s and cookbooks (yep we still have DVD’s -don’t judge).

closed charging station

The result isn’t beautiful but it is contained and covered with cabinet doors that Mr. Math built to match our kitchen cabinet doors.  He had to make them super tall to fit the space, but I like the look.  He is so talented.

It makes me happy to know we solved one of our points of contention.  Now on to the next project.

I hope you have a great day.  I love hearing from you.

Blessings,

Karen

Behr Paint with Primer, Dresser, Painted Furniture

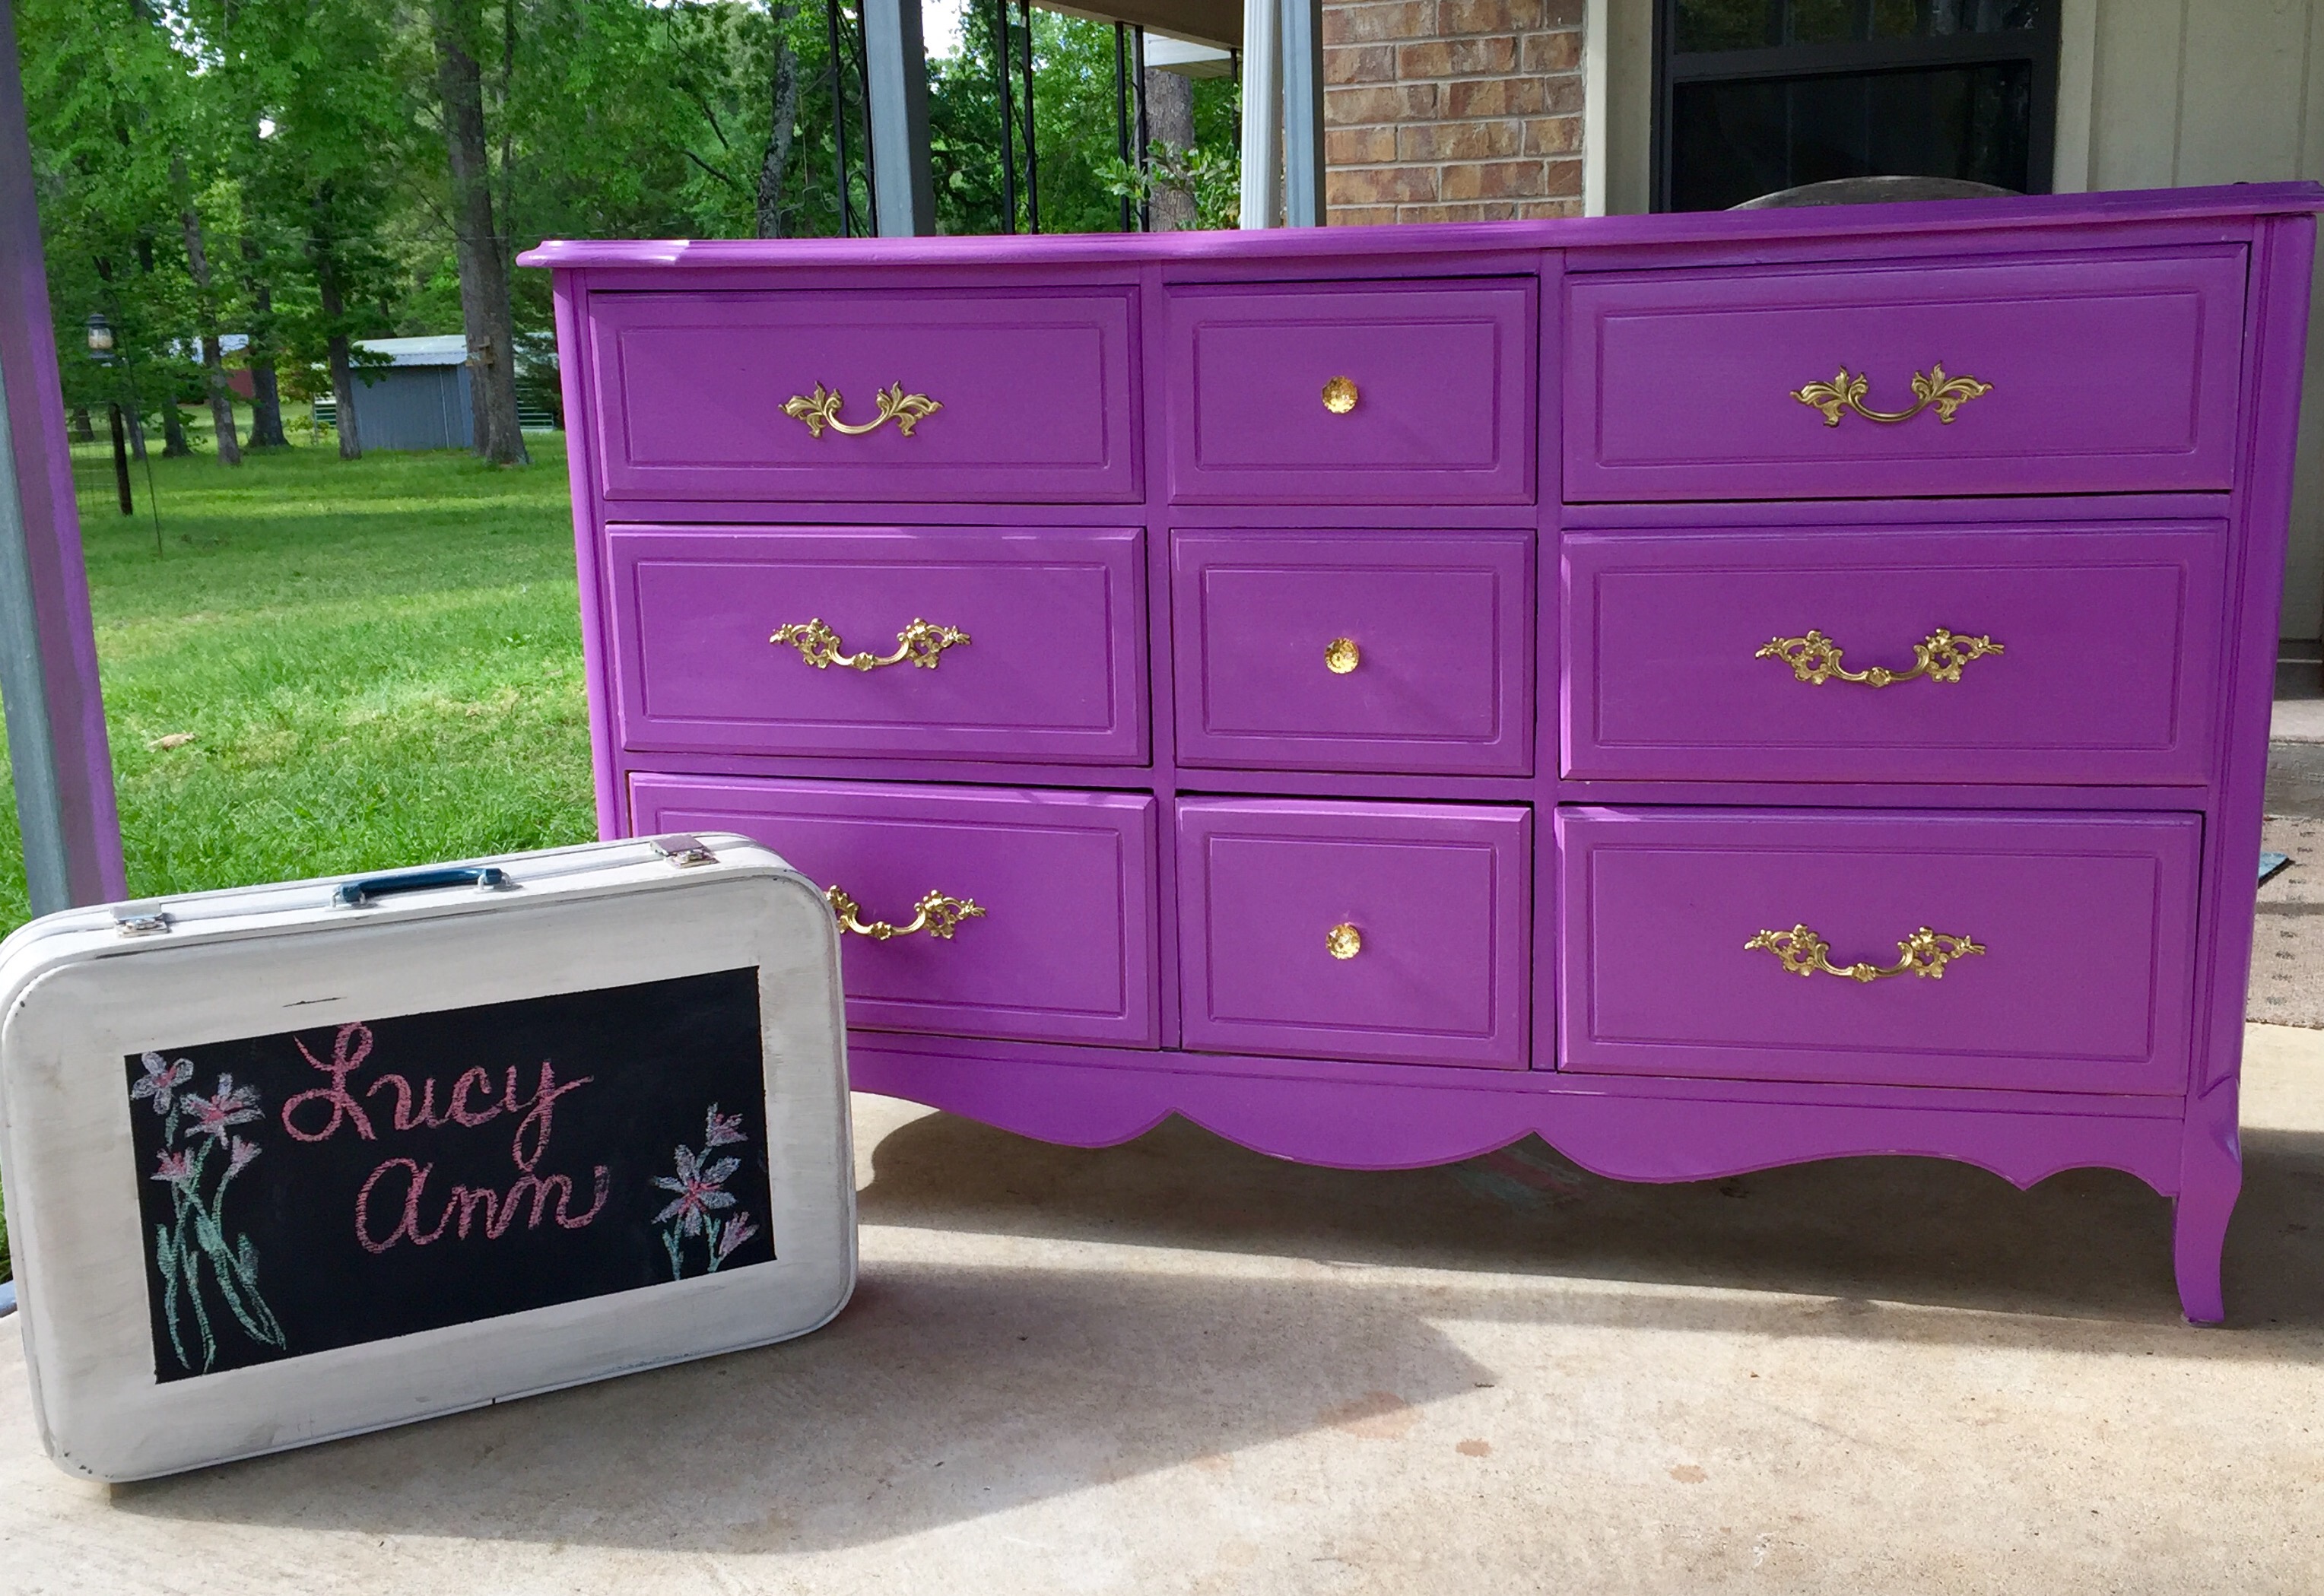
Little Lucy’s Dresser

I am such a lucky mother in law.  I must have done something right with my own kids because they both made great choices of partners to share their lives with.  My son, Baby Boy and his wife, Sweet Amanda are expecting their first child.  More importantly, they are expecting our first grand baby, on both sides of the family, and first great grand baby on both as well.  We are beyond excited.

Sweet Amanda asked me if we would find her a crib and dresser as our gift for the baby.  I was so happy to be a part of the process.  After sharing Pinterest ideas with her and checking out what she seemed to gravitate toward, it became clear that she was looking for an eclectic mix of furnishing and color.

She seemed to keep going back to this dresser, from Project Nursery.

Painted Purple Dresser with Sea Mist Blue and Gold Knobs

The title of this post is June’s Purple, Teal and Mauve Striped Nursery.

I knew I needed to start looking for a long dresser and I was lucky enough to find this beauty at an estate sale for $40.00.

img_1122

It was in a little rough shape after being loved by another little girl but the piece was solid wood and fit the bill for what we were on the lookout for.

The only real problem was the formica top.  I researched and found out that Kilz makes a super sticky primer called Kilz Adhesion Bonding Primer.  Our Home Depot doesn’t carry it, but they did order it for me.

It got primed then painted a beautiful purple called I Heart Potion

BEHR Premium Plus Ultra 1-gal. #P100-5 I Heart Potion Satin Enamel Interior Paint

The hardware knobs got replaced with these crystal knobs, because, well a girl needs a little sparkle. The original handles were painted with Rustoleum gold spay paint.

Hickory Hardware Crystal Palace 1-3/8 in. Crysacrylic Polished Brass Cabinet Knob

It was a push to get the dresser done in time for the baby shower, but we made it.  I cannot believe we will be meeting the sweet girl in less than a month.


We are just a bit excited.  

Thank you for following along on our journey.  We love hearing from you.

Blessings,

Karen


Behr Paint with Primer, Blogging, Dresser, French Provincial, Painted Furniture, The City House

The Purple Nursery Dresser Project

If you are new to my blog, welcome.  I am thrilled to have you join us.  You might not know a lot about me, but my son, Baby Boy, and his wife, Sweet Amanda, are expecting our first grandchild May 1.  We are so very excited to be grandparents.

Our kids asked us if we would mind furnishing the nursery as our gift to them.  We were thrilled.

The first order of business was a crib.  We found an awesome crib online sort of like this one:

It was very gently used and will be painted gray.  It will be so cute for our coming baby girl.

The next order of business was to find a dresser for the sweet baby girl.  I know that my daughter in law has a soft spot for French provincial dressers (you can see their bedroom furniture here) so when I spotted this beauty for $40.00 at an estate sale I was thrilled. It is going to serve as a diaper changing station and dresser in the nursery after it has a little love.

img_1122

After both of us looking online, a lot, I could tell that Sweet Amanda was leaning toward a purple dresser.  I was not in the least bit surprised when she started leaning toward purple.  Her college home had an eggplant purple kitchen, her efficiency apartment after graduation was painted what my son called Barney purple, her dining room wall was covered in frames that were shades of purple.

I Love a Finished Project- The Purple FramesThat sweet girl loves herself some purple.

There are lots of examples of beautiful purple dressers out there.  Sweet Amanda is weighing her options carefully before giving me the “go ahead” on colors to make sure it goes with her bedding.

Project Nursery

Project Nursery

By Stephanie Lynn

All Things G & D

Probably My favorite is the brightest purple dresser from Project Nursery below, but I will be happy to do whatever the mother to be wants.

img_1121

Because the dresser has a formica top, I am going to be trying out a new primer on this project that is supposed to stick to plastic surfaces better.  Kilz Adhesion.   I had to have it shipped to the house because our local stores don’ t carry it.  I will let you know how it works.  This weekend the project is to get the dresser cleaned, repaired, hardware removed and the dings fixed so we are ready for primer and paint once the Kilz arrives and we have the color nailed down.  It is going to be stunning.  When I was a teenager, my parents let me redecorate my bedroom and I ended up with a purple bed, purple headboard, lime green bedding and curtains having a brightly painted dresser is not so unusual in my world.  Of course I have done my part to make sure that a few more dressers got a coat of paint along the way, too.

French Provincial Dresser

Black Dresser and salvaged chair

dresser to bar

Funky Dresser

Having a grandsweetheart on the way is exciting.  Having a daughter in law who lets me participate in the decorating is awesome.

I am blessed.

I love hearing from you,

Karen


Behr Paint with Primer, cedar lumber, Country living, Country Style, family, Fun with friends, home decorating, Ranch House Overhaul, Real Life

Week 5 Progress

Knowing company is coming can motivate a person to get busy on their home.  Knowing several of those guests are active elementary and junior high students really motivates me to get the house de cluttered and ready for the crowd.

Here is the weekend progress:

1.  The Guest Room is now presentable.  There are still areas that need touch ups.

  • The walls got painted.
  • A set of donated shuttered got painted and hung on the wall.
  • At
  • Art, a mirror, and a window got hung.
  • New curtain rod.

1-IMG_8091


2.  This awesome light now hangs where the light I lovingly called the pool table light was over the bar.

IMG_0951

Before

1-IMG_8081 1-IMG_8083 1-IMG_8084

The awesome after.

3.  A section of the bathroom now is under way.  The mirror will be framed with rustic wood and the bathroom cabinets will be painted white. The rest of the bathroom needs to be painted still.  The color is a pale bluish green.  Never judge a color until the old paint is out of the way.  Look at them together… yuck.

IMG_0957 IMG_0956

1-IMG_8073

Before

1-IMG_8074 1-IMG_8077 1-IMG_8079 1-IMG_8080

During… did you notice the name of the bathroom hardware?  I did not until I edited the picture.

You have to wait to see the bathroom.  Sorry.  I want you to see the full effect once it is done.

We also did some really boring but necessary things like mow, organize closets, and unpack boxes.

Then… the fun started.

5 kids and their parents showed up.  They played, they explored, they fished, they ate s’mores, they went tubing, jet skiing, they threw the frisbee for the dog, they played nines, the ate… A Lot.  Those kids can flat eat.

1-IMG_8095 

  
1-IMG_8099 1-IMG_8104

We were sad to see them go.

1-IMG_8103

This week I am going to give you our tricks for feeding a crowd and a few hints for Christmas presents if you have outdoor space.

Happy belated Labor Day to all of us who get up every day and go to work.

Have a great week.

Blessings,

Karen