Behr Paint with Primer, Building a Home, Coldspring, Painted Furniture, painting, Repurposed Furniture, Rubbish Rescue, vintage style

Covering the Breaker Box in the Guest House

I love our guest house. It is more of retreat for me than a guest house actually. I paint, read, and nap out there.

It is my favorite spot on our property.

I am generally happy with how the place looks and is decorated, and I love the exterior, the windows, the wood floors and the bathroom but there has been a spot that has bugged me since the sheetrock went up.

The breaker box stuck out from the wall and even worse it is slightly crooked. I made a really bad choice with the contractor I selected. While we were out of town he allowed an inexperienced crew to sheetrock and it was terrible. The contractor did not stand by his work and abandoned the job shortly after. Fixing the breaker box would require ripping out sheetrock and framing work and I’m just not willing to go through that yet.

For a year I’ve lived with the crooked ugly box but I kept looking at some cabinet doors in the shop and an idea formed.

I disliked the breaker box so much that this is the only photo I could find of it!

This past March we went to pick up furniture and I picked up some cabinet doors and hardware. The cabinet doors were literally about to go on a burn pile. The pile was already burning and they were stacked up ready to take over once we left. I took them home with me when they were offered.

My husband built a box to hang the cabinet doors from out of 1X 4 pine. He clamped, glued, and screwed it together then let it dry. After it was dry he attached metal corner reinforcement to the box.

I knew I wanted something that didn’t protrude very far into the room so a shallow ( 4 inch deep) cabinet that covered the box and had easy access to the breaker box was the answer.

He attached the box to the wall with angle brackets into the studs then used the hinges that were already

The cabinet door is plumb (vertically level) just to give you an indication of how crooked the breaker box is.

Once to the doors were installed I painted the box and interior the color of the walls, Behr Helium.

I painted the doors the color of the v groove wall, Behr Ocean Boulevard. I feel like at this point I need to remind some people that A: I don’t paint over all wood. There is a ton of stained wood in the guest house. B: These doors are not antique even though they are solid wood. C: The doors were headed for a burn pile. Surely painting them is better than destroying them.

Ocean Boulevard on the wall behind the kitchen cabinets.

The door color was a little more intense than I wanted so I whitewashed and distressed the carving and detail on the doors. I am pretty pleased with how it turned out.

I am so happy to not have to look at the breaker box anymore!

I hope you have a great day!

Thanks for following us as we continue to work on our home.

Coldspring, DIY Furniture, Painted Furniture, Providence Acres, Rubbish Rescue

A Seven Foot Buffet Table for the Far from Perfect Patio

We bought a stainless steel tool bench table top that was dented because it was dropped in shipping for $45.00 a year ago. The top is a stainless steel sheet covering workbench hardboard and weighs 83 lbs.

I didn’t know exactly what we were going to do with the tool bench top but I convinced Mr. Math that we needed it, even if only just for the shop and it was a great deal. Now that we have the deck, I wanted a serving table/ work space sort of what they made at Always Chasing Life . I liked the casters so that we could move around where we needed it. Now that we can move from the the front porch to the back porch all on the same level it will be easy to set up as we need when we once again have groups over to the house. Since our serving table will be outside all the time it needed to be made from treated lumber or painted with outdoor paint or with rot resistant wood. This one has a bit of all that.

We are still working on a budget to get the deck done and I am still trying to get the clutter cleaned up in our storage so I tried hard to not buy anything more than absolutely necessary for this project. I knew we had some 4×4 posts for the legs a friend gave us a while back when they repacked their porch posts. I also remembered that we have scraps of cedar boards around that need to be used up. We just had to purchase 4 2X4 boards and 2 1X4 boards along with casters for the legs to help the 7 foot beast move around easily in order to put this together. I collected the scrap cedar and posts then Mr. Math bought the wood and casters.

The cedar was a variety of lengths and widths. A table saw and planer fixed that.

Mr. Math assembled the frame and I stained and painted it with materials on hand.

I knew I wanted the shelf on bottom to be able to hold things when needed but not hold water when it rains so we spaced the boards four inches apart. We cut the boards for the shelf to width, planed, and sanded most of the old paint and stain off the boards-but not all because I like letting it show through , then sealed the cedar boards with a clear outdoor sealer and finally nailed them to the bottom 2X4’s for additional storage when using it as a serving table. We did leave the center board a little wider to make the spacing work.

L brackets attached the top to the base.

The table is far from perfect just like everything back there and Mr. Math still needs to work on the dents on the top a little more but it looks good and will be useful. It won’t rust or rot outdoors, will be a good work station and food serving space, and will store right next to the house.

The Husky sign side will be the back side of the server, but it isn’t awful.
This ding needs additional love but will never be perfect. I am okay with that.
It will be parked here until the grill gets moved and the deck gets stained. Then it will be under the covered porch.

Altogether we spent about $60.00 on a seven foot long counter height stainless workspace that is far from perfect but I am thrilled to have it. I can’t wait to get everything totally put together and for us to be able to have a blow-out party once the coast is clear on the Covid front.

I hope you are staying safe, and finding reasons to be thankful in this season.

We love hearing from you.

Blessings,

Karen

Charlotte NC, Country Style, crafting, Fun with friends, Rubbish Rescue, rustic, the Southern Belle

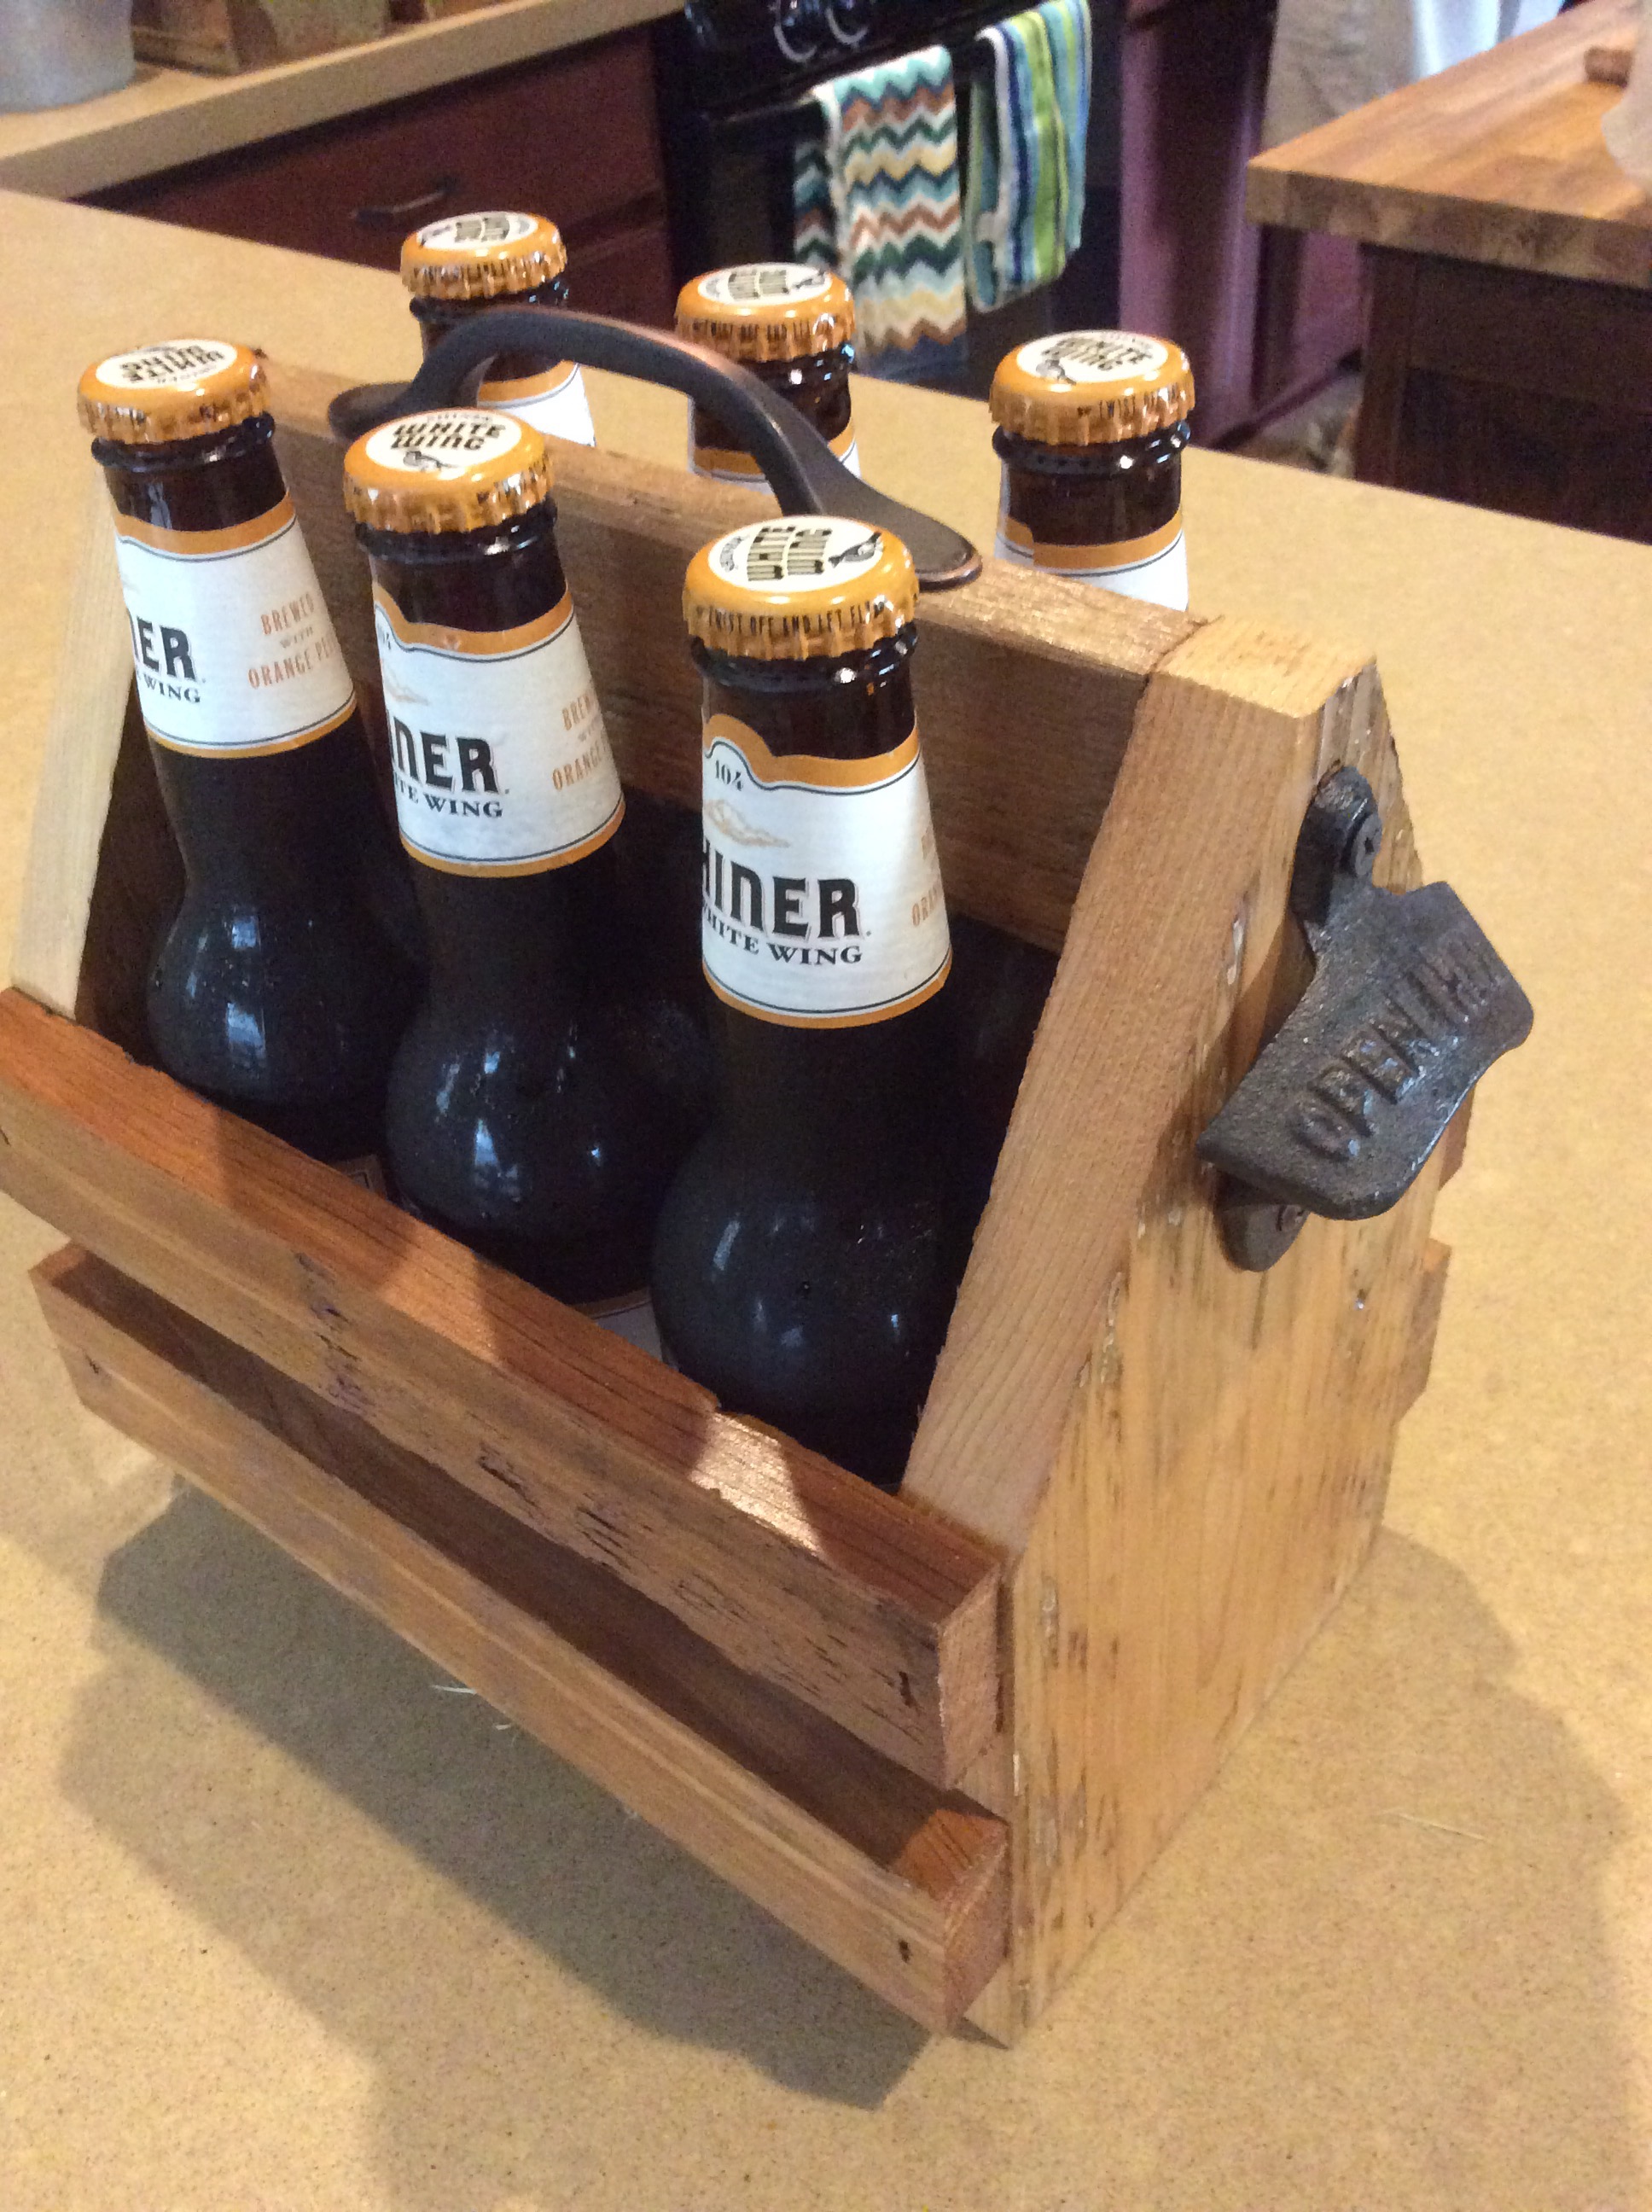
Making a Bottled Drink Holder

Want a quick and easy gift to take when you are an invited guest this summer that even the dudes will like? I have just the project thanks to Rogue Engineer.  I love his detailed directions.  Check him out.

Here is the link to his very detailed plans including how to cut and assemble.

Beer Carrier

DIY Beer Tote | Free Plans | Rogue Engineer

Source: Rogue Engineer

Mr. Math cut four of these puppies out in less than an hour.  We used reclaimed scrap wood so we probably had to work a little harder than necessary sanding, and adjusting for the wonky wood sizes but the wood was F-R-E-E.  They were totally out of scrap wood left over from the media console.

reclaimed wood media console

The carrier works great for small bottles of soda as well as for beer and would be a fun host/ hostess gift for outdoor summer parties.

The total cost of the project for us was for the handle (check out ReStore if you have one close by) I paid two dollars fifty cents for my handles only because my hardware is all locked up in storage right now and our nearest Restore is thirty minutes away.

Bottle opener from Hobby Lobby ($1.49 right now.). They are 50% off  at least once a month.

Brown Cast Iron Pop Bottle Opener

The first one is going to the sweet lady who called me to let me know she had cedar siding that she was getting rid of and wanted to know if I needed it.  The wood for the project came off her house.  She will enjoy seeing what we did with it.  I left a lot of the green paint from her lake house on the cedar.


We added a lot of poly to the knot hole so that it won’t fall out.   I love that piece of wood best.

          The other three are headed to Charlotte, NC.

I can tell we will be making a few of these in the near future.

Mr. Math has already figured out the dimensions for a four bottle wine holder.  I know I will have some takers on that, too.

I think the wine holders may be made from our red cedar hanging out in storage.

Oh how I long to have our shop up and running again!   July is coming.  Woo Hoo.

July 10 we close on our new spot.

Curbside rescue, Dresser, home decorating, Roadside Rescue, Rubbish Rescue, Thrifting

Burn Pile Barn Door

Today I am going to show you the amazing barn door I made from wood that was destined for the burn pile.

close up of barn door

I have an odd obsession with things saved from the trash.

I own (or it owns me depending who you talk to) a rescue dog.

lumi nose

I cheer every year when this rose blooms because Mr. Math mowed over it twice trying to get rid of it before giving up and leaving it alone.

hardy rose

I have saved several pieces of furniture from the trash or the burn pile. They are some of my favorite projects.

the finished vanity


Burn Pile Vanity

roadside credenza


Roadside Credenza

Finished Mudroom Bench


Mudroom Bench

My dad, the original junker in our family, had some cedar cut on his property on “halves “. Basically that means he got half of the wood and the person who cut it into lumber got half for payment. Some of the cedar had imperfections that went into the cull pile. It was wormy , or bowed or split.

cedar lumber


Cedar Windfall

My dad saved that wood for me. He knew I would want it. My dad knows me well, I did. There was a lot more wood than I expected , and it has been consuming almost a third of the Garagemahal for almost a year drying. I wasn’t sure what this wood would become but I knew that one day I would find a home for it.

I found a home for some when The Social Planner’s son bought a FEMA trailer that he and his dad are gutting and turning into a cool home for this single guy who works on yachts in a very expensive bayside community.

fema trailer turned to solar powered rv dubbed emergency response studio 14   From FEMA Trailer to Solar Powered Studio and Home

You might check out what people are doing with these trailers online.  They were filled with formaldehyde when they were built for families after the hurricane decimated New Orleans and were dumped by the government as soon as possible.   You can pick one up for a couple of thousand dollars now but they need all the junk on the inside removed.

The look he is going for is rustic industrial. I can’t wait to get some shots of the inside.  Right now the kitchen is done but everything else is under construction.

We made the door quickly out of some of the cedar.

First we sorted out the wood and put it out on the floor to look at and move around then cut them all to length.

cedar door cedar planks sawdust cedar boards


Next we clamped the wood and added a board at the top, bottom and across diagonally to make a Z.

clamped cedar barn door

z barn door


Here it is finished.  The door has five coats of polyurethane on all the door and seven inside the crevices.

the finished barn door close up of the door close up of barn door

It is going to look amazing in the trailer along with this piece that is going to be a counter once it is coated with bar coating.

cedar counter

I hope you all had a wonderful weekend.

Thank you for reading my blog.  I appreciate hearing from you.


Blessings,

Karen

Blogging, mid-life, Rubbish Rescue, the suburban home

(Not) Measuring Up

It has been a while since I wrote a post for the blog. I have been in a real funk for several weeks. It has taken me a little while to work through what had me feeling down. I realized that along with a hurt back, my main problem was that I just didn’t measure up out here in blog land, in my life, or with my projects. I started to believe I did not have anything worth sharing.

It took me a while to figure out that I was using an unrealistic ruler to measure my life… the Internet, Pinterest, HGTV…I also forgot for a little while that hobbies are supposed to feel like fun, not pressure. I started to feel stressed about my projects. Would they measure up?

When I log onto some of my favorite blogs, I found myself comparing my home to the beautiful images on the screen. There is a home tour right now that has some beautiful homes. You can start the home here: http://southernhospitalityblog.com

20140606-065111-24671538.jpg
Isn’t that a beautiful room? I love the light, the classic furnishings, even the pillows are plumped and chopped.

I don’t live there. I live in a home with a husband who frequently forgets his shoes in the family room and must have a reclliner, two dogs who drag in dirt daily, a cat who causes the big dog to jump up on the furniture in hot pursuit at least once daily, not to mention my clutter and projects making a mess. That room would look like a tornado blew through in about five minutes at my house.

Here is my family room, as I found it this morning. All I did was turn on the lights.
See the dog? More on that in a moment.

20140606-073606-27366996.jpg

Here is what she was up to.

20140606-073711-27431368.jpg
One water bottle shredded.

And that was after she chewed on this bill.

20140606-073812-27492360.jpg

We have wires that are unsightly.

20140606-073918-27558492.jpg

And the men in my home seem to have a vendetta against pillows. One is missing a button now and my pretty ruffled down pillow apparently was sat on recently. How about the coffee table?

20140606-074254-27774432.jpg

I am sure you have seen enough by now. My home is not Pinterest worthy. I started to feel like I had nothing to offer, nothing to say.

So… I had to reexamine why I blog, who I blog for, and regain my own personal center.

I blog because I like to connect with folks I may never meet in person. My home and projects are a creative outlet for my sometimes stressful and high pressure job. I really do like hearing from you all and I love the suggestions you make. I never would have tried my new favorite red color- red, red wine without the suggestion.

Over this summer I am going to work on a series about keeping it real. I am going to beg you all to send in pictures from time to time, so be prepared.

I have some really cool projects planned this summer, but those projects don’t define me.

I hope you stay tuned, but I am okay if you don’t. No hard feelings.

Now, I am off to tackle my garage.

20140606-080854-29334864.jpg

20140606-080854-29334414.jpg

Now you go check out that home tour. Just don’t measure your own home by what you see, please.

I hope you have a blessed day,

Karen

cedar lumber, Curbside rescue, DIY Furniture, milk glass, reclaimed wood, Rubbish Rescue, Style, the suburban home

Bathroom Shelf DIY

When I started thinking about redoing the master bath I found this awesome picture.

20140511-174749.jpg
I wish I had saved the location I found this. I have checked my Pinterest boards and done an image search with no luck. If you find where it came from, please let me know and I will gladly credit it to the source.

Annnnywayyy… I loved the rustic look and knew it would be great in our very builder basic bathroom.

20140511-175332.jpg
This is a photo of our home when we were looking at it to purchase. The great piece of furniture did not stay with the house. It is just a very boring sage green space.

As luck would have it, my junker collector mom picked up a small section of fencing for me. It was the perfect size! I wanted thicker shelves on mine so I modified the design above to make it more what I wanted.

I decided I could take this on all on my own. I am trying to do more work on my own so that my Hubby has time to do what he loves. I did not end up having the skills I needed.

He did have to help me connect the air nailer (I tried, but that bugger wouldn’t go in), he put in the screws for the 2X4’s, he ripped the front boards on the table saw because it scares me, and he volunteered to move chop saw for me.

Thanks, Hubby.

The steps are simple.

Cut three 2X4’s about a half inch narrower than the width of the section of fencing.

Figure out where you want the shelves to go, then screw the 2X4 in from the back side of the fencing section so that the wide part of the 2X4 sticks out from the fencing.

Cut 5 sections of fencing planks to length.
3- the length of the 2X4 plus the additional length to go to the edge of the siding

2- small sections to cover the ends

20140511-184636.jpg
Hubby ripped one board length in half with the table saw to make the shelf more narrow.

I air nailed them together pretty quickly.

20140511-182457.jpg
Here it was when finished.

See the tops of the fence pickets? I liked them, but our rescue dog, Lumi, did not. She chewed one of the pickets off while we weren’t watching. It had to be chopped off even. I like the result even better, but don’t tell Lumi. She was in big trouble.

Here it is, hanging in the bathroom.
I love the results.

20140511-183710.jpg

20140511-183736.jpg

20140511-183807.jpg

<

20140511-183834.jpg

20140511-183850.jpg

20140511-183906.jpg

I hope I can learn to to more on my own.

Let me know what you think,

Have a great day.

Blessings,

Karen

burlap, Fall decorating, home decorating, moving, Rubbish Rescue

Fall Front Yard

Have I told you how much I love fall? I love the color, the cooler weather, and spending more time outside. We got busy cleaning up the yard and putting up a little fall decor. Life on the cul de sac is great and the neighbors are known for their Halloween parties so we had to make our house look presentable.  The large pumpkins were cut out from left over fencing when we put in the reclaimed wood wall.

DIY HERE for Reclaimed wood pumpkin.
The flower bed is cleaned up, some mums are planted, and the pumpkins are out.

Pumpkins

I really did take the stickers off the pumpkins.  Not sure why this is the only photo from this angle I saved.

purple mums

The reclaimed pumpkins add a rustic charm to the front yard of our Austin stone and red brick home.

reclaimed wood pumpkins

Here is a close up of the bow.

reclaimed wood pumpkin

I really do like the asymmetrical shapes.

fencing to pumpkin  Welcome fall!

fall front yard

I left the zinnas that are still blooming so they got to stay.  The others are now in the compost.

fall flower bed

Behr Paint with Primer, Chair, family, glazing, master bedroom, new home, Painted Furniture, recycled furniture, rescuing damaged furniture, Rubbish Rescue, Thrifty decorating, vintage style

A Chair With History

I for sure, one hundred percent get my junking tendencies from them.  Both my parents are the use it up, make it last, only throw it away as a last resort type. They were green before it was trendy.  My mom reuses her zip lock bags because using them only once would be wasteful.   My dad also tends to be a junk collector like me.  Recently I have been able to use a few of his finds.  I now have this awesome work table under the porch at the Garagemahal because he found the resturant table legs.  I have this amazing buffet table because he picked this wood up out of the trash, and now I have a reading chair in my bedroom.

Of course she has a story.  It involves a scary old house, a copperhead snake, and a cane.

My dad purchased some property a while back with a house on it that is literally falling down.  I have been the recipient of this amazing window from there.

green window

The house has not been lived in for 50 years.  While looking around the house from the outside dad saw a chair that had been abandoned.  He asked me if I wanted it.  Heck yeah.  I didn’t even have to ask any more.  A chair that was junk 50 years ago and still is around today was at least worth looking at.  My mom and dad climbed up in the old house to get the chair.  Quite a feat since my dad had recently had back surgery and was on a cane.  As they walked across the room of the house toward the chair a copperhead stuck its head up between the boards, according to my dad,  my mom took off and left my dad to fend it off with his cane.  We have a history with copperheads at our house

.  My Hubby almost died from a bite at Star Hill a few years ago so we have great respect… and a score to settle.

English: Copperhead Agkistrodon contortrix mok...
English: Copperhead Agkistrodon contortrix mokasen at Louisville Zoo (Photo credit: Wikipedia)

Dad made short order of the snake and managed to bring home the chair.  The chair wasn’t much  to look at.  Okay, she was a total wreck.  But I liked her low slung style.  She is definitely from the 1940’s.  The total opposite of the sleek modern style of the 50’s.  Thick and chunky and close to the ground.  She was broken on the back but nothing a little Gorilla glue and screws and Hubby couldn’t correct.  This piece has really for real worm holes.  You know how they try to replicate the tiny pin holes in furniture?  This old lady got hers the hard way.  My brother brought the chair to us and she looked even worse than I remembered.  You could literally take pieces of it off with your hands because the pegs holding the chair together had shrunk to the point they weren’t holding.  Hubby had to put it back together like a Tinker Toy set.

See the dots on the arm below?  Those are the for real wood worm holes that people try to replicate.

20130929-221850.jpg

20130929-221819.jpg

20130929-221834.jpg

I found a cushion that fit perfectly in Target’s patio clearance section.  $7.00 for this all in.   It was originally much more expensive.  I have no idea why it was marked down so much. I love that.  Perfect color for the room with the updated lamps, and my newly built bench.  The cushion fit the chair upside down.  The part that should be the back is the seat.

I am just going to stick in some pictures of the process here, but I am sure it would put you to sleep to see how many weeks this old girl was in the process of gluing, clamping drilling etc.

IMG_3416

IMG_3571

IMG_3639

I stained the arms dark walnut and I painted the body of the chair Behr Powdered Snow with a brown glaze.

Didn’t she turn out pretty?  I am going to love sitting in the chair by the window reading.  It is a real curl up in chair.

IMG_3737

IMG_3740

chair for bedroom

burlap, Christmas, crafting, DIY Art, home decorating, Rubbish Rescue, Thrifty Art, Thrifty decorating

Decorating the Mantle for Christmas Without Breaking the Bank

I decided that this year I would use what I have on hand to decorate the mantle. Over the year I had purchased a dictionary at a resale shop for 50 cents, I picked up a rough bulletin board when my neighbor moved out, I purchased a torn up hymnal at a garage sale for 25 cents, and I had a couple of ginger jar vases left from my son’s wedding.
I picked up two yards of drapery fabric at Hancock’s Fabric on super clearance for $2.35.
The first step was to draw off a large S on cardboard. The S was covered with pages from the hymnal. I used regular old school glue thinned down to a watery mixture. I did the same with dictionary pages wrapped on the ginger jars.

20121222-073343.jpg
Buy old dictionaries when you find them. They are one of my favorite decorating items.

20121222-073708.jpg

20121222-073437.jpg

20121222-073759.jpg
The paper flowers were made by layering some concentric circles of dictionary pages in top of each other then stitching through the stack with jute twine. I made slits in the layers then wrinkled each layer.

20121222-074313.jpg

20121222-073833.jpg

20121222-073816.jpg
I covered the old bulletin board with fabric. Super easy. I used a staple gun.

20121222-074516.jpg

20121222-074529.jpg

The large S was attached to the fabric with hot glue.
The flowers were attached to some salvaged glass jars I painted teal.
I took pages of the hymnal to create a JOY banner.
The jars were filled with spray painted branches from the yard and two packages of Dollar Tree ornaments. Everything else came from the house,
All in all I am proud of my mantle. Less than $10.00 spent and totally unique.

20121222-083141.jpg

20121222-083205.jpg

20121222-083233.jpg

DIY Art, painting, rescuing damaged furniture, Rubbish Rescue

Making Necklace Hangers For Gifts

Before Sweet Amanda married Baby Boy and moved in with him, she lived with some great girls. They will always be a close knit group who loves each other. They exchange Christmas presents each year at their girl party.
Apparently they are all crafty.
Sweet Amanda was excited. She had her crafty presents all lined out until she got wind that another of the crafty girls was making the same thing. Her original plan was to make bookends that I will show you once I get pictures from Molly.
Sweet Amanda was back to square one so she raided my hoard for inspiration. I had a bunch of drawer fronts from several projects and a few from the roadside.

20121218-215727.jpg
They were too good to throw away. I also have a collection of knobs, pulls, handles, hooks and other assorted hardware.

20121218-215912.jpg
Of course there is a collection of paint colors from past projects in the Garagemahal.

20121218-215519.jpg
When everything was assembled, Sweet Amanda decided to make necklace hangers/key racks/scarf and headband holders out of the assortment. That meant selecting just the right items for each of the four friends. The drawer fronts were selected, the hardware was selected, placement was decided, holes filled in and they turned out great. It was so humid that even Baby Boy got involved. He has mad skills with a blow dryer. (He also drilled all the holes.)

20121218-220547.jpg
Sweet Amanda filled the holes with wood filler.

20121218-222441.jpg

20121218-222500.jpg

20121218-220710.jpg
Blow dryer.

20121218-220807.jpg
Drilling the holes.

20121218-221010.jpg
Each one was unique. This funky one will go to Beth. A girl who has a suitcase chair needs this fun piece.

20121218-221205.jpg
Every knob is different.

20121218-221341.jpg
Amanda’s buddy Tara got this one. Painted with Martha Stewart Froth.

20121218-221453.jpg
This one went to Lauren. It has the coral from the chandelier.

20121218-221729.jpg
Molly got the yellow and blue.
This was Hubby’s favorite. He thought it was happy.

20121218-221945.jpg
I loved them all. I hope the girls like them too. I hope I get pictures of the other gifts to show you how crafty these girls are. Great job, Sweet Amanda!

20121219-062058.jpg