Coldspring, collecting, Country Style, crafting, Curbside rescue

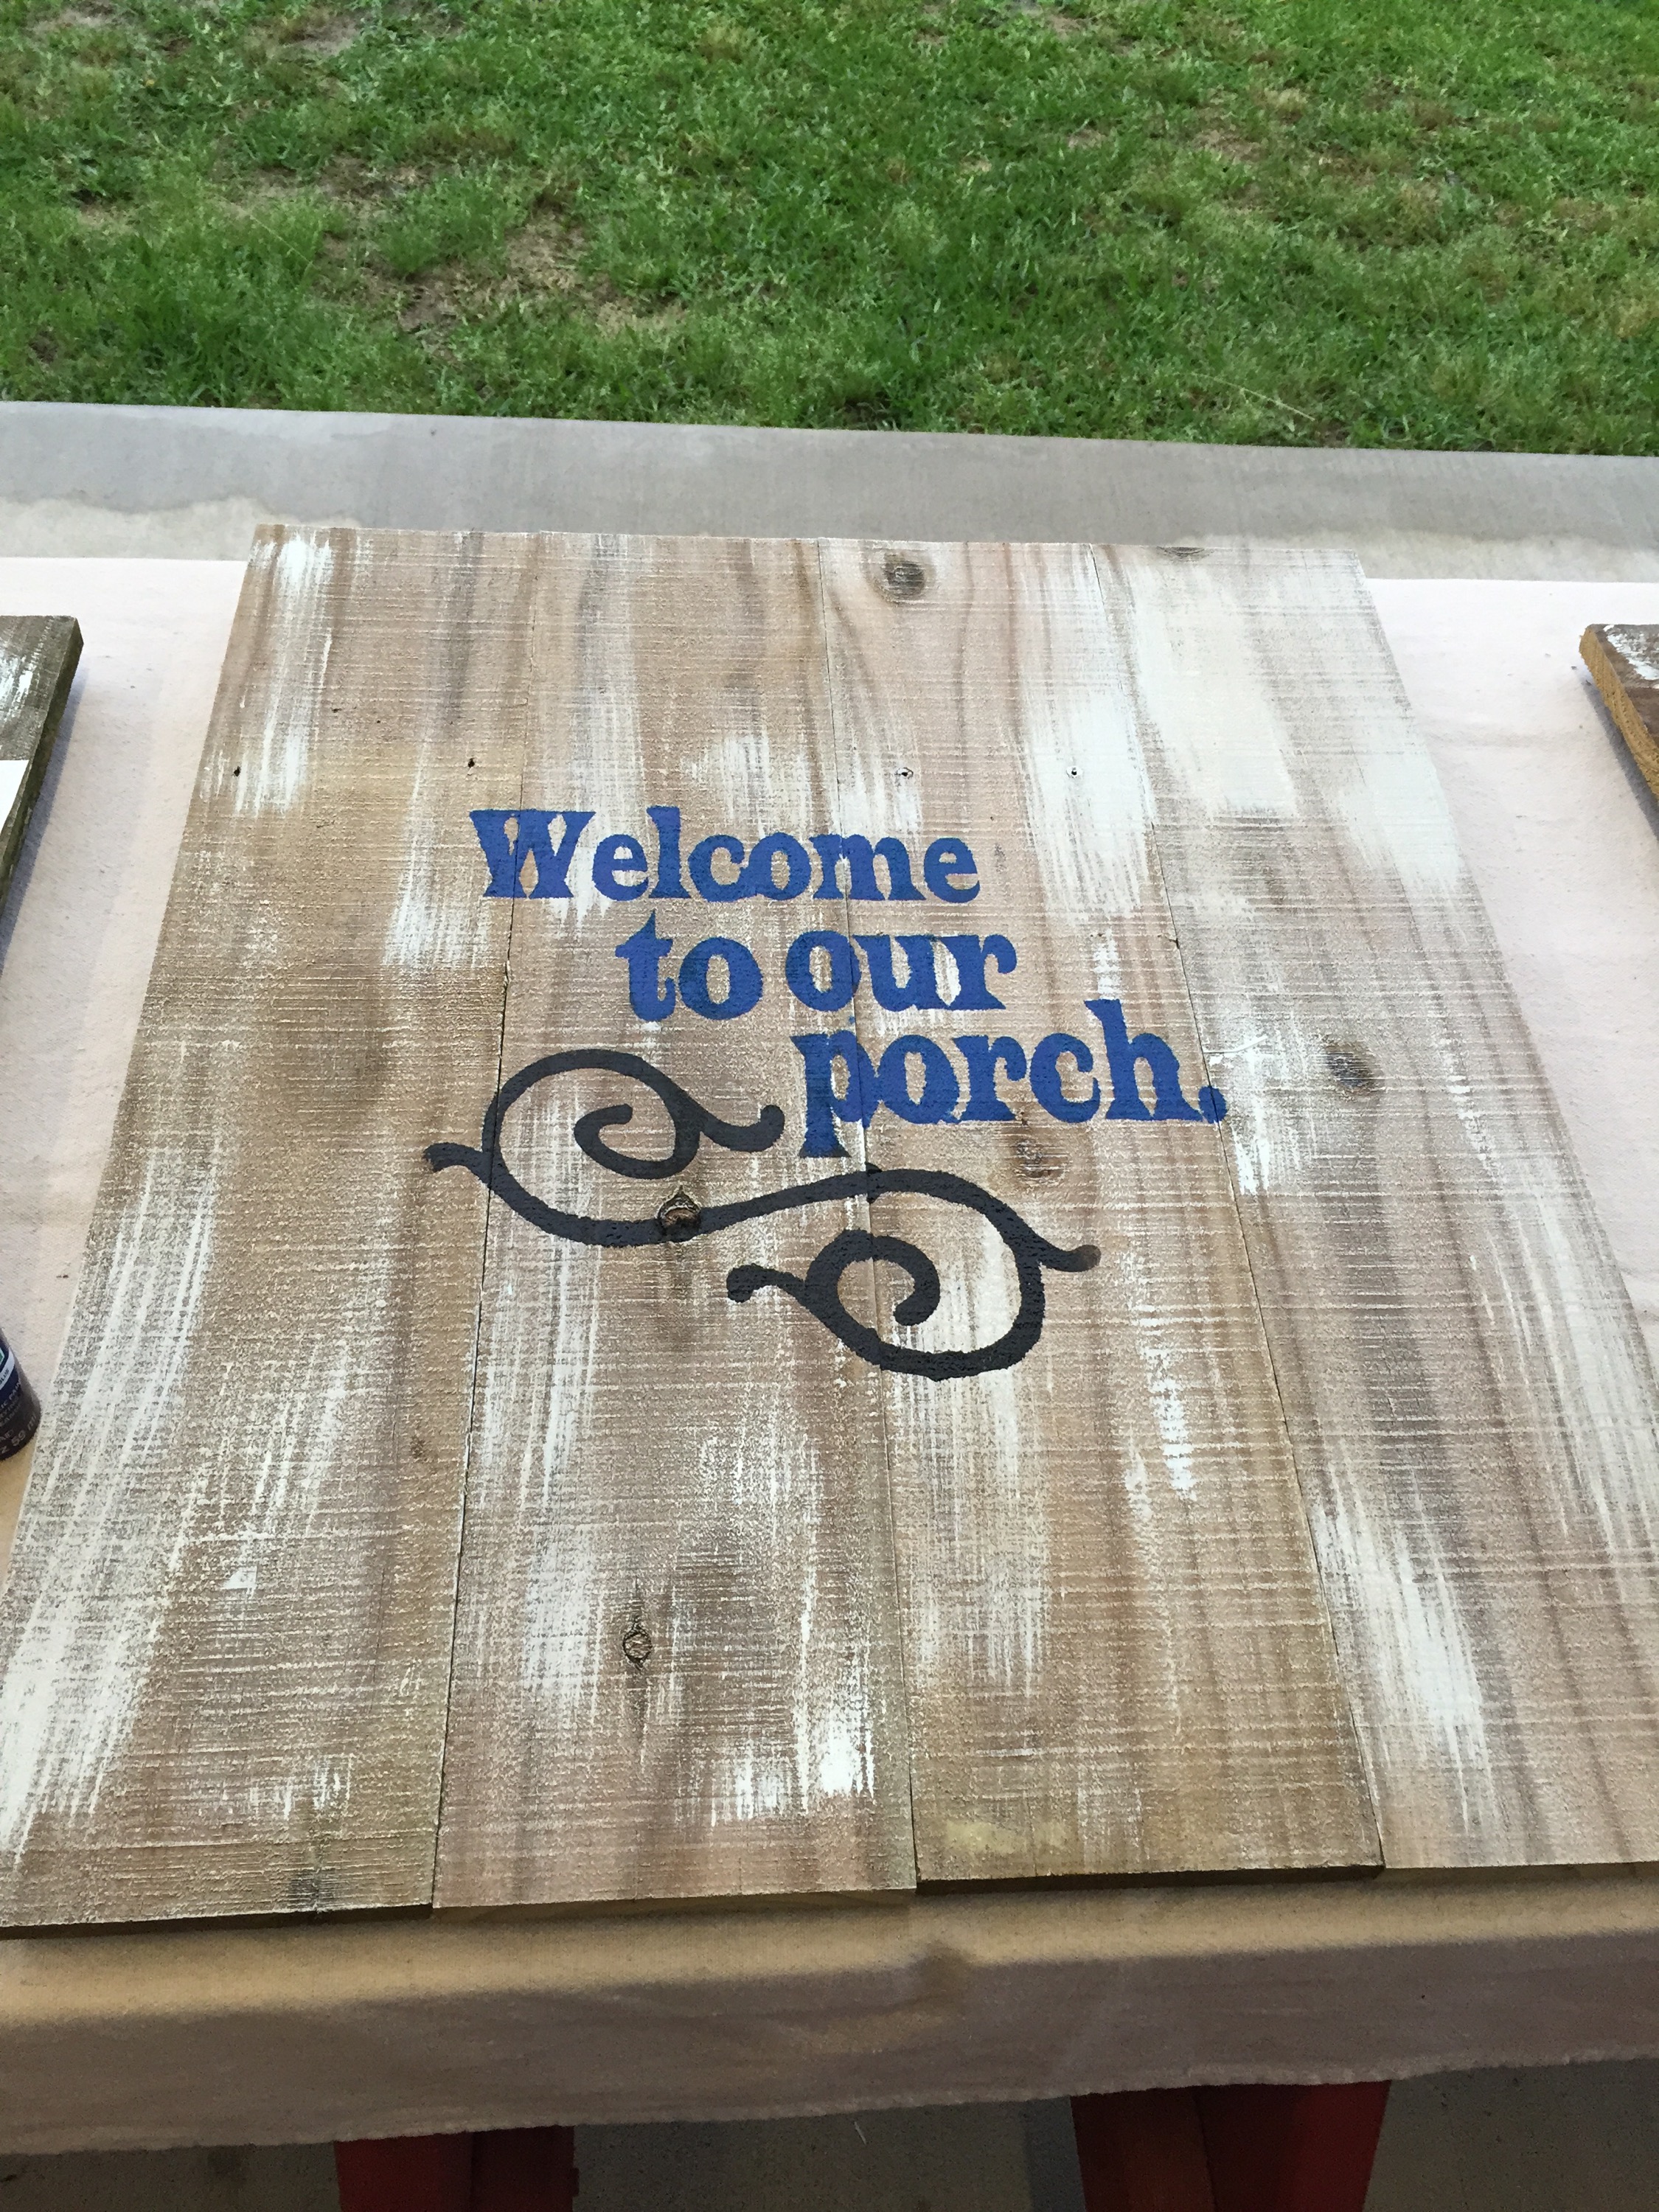
Reclaimed Wood Signs

I love the look of reclaimed wood and I have been smitten with reclaimed wood signs for a while.  This week it was my turn to do the craft project for our ladies craft night so of course I planned a reclaimed wood sign project.  We picked up  a ton of cedar fence pickets off the side of the road a while back and have been putting them to good use.  We have used them to cover my office wall, our bedroom wall at the lake, and I covered the top and drawers of a dresser with the wood.

reclaimed fencing washed

This week we cut the wood to length for 8 signs and I glued and nailed two thin strips of scrap to the back of each set in order to make a canvas for our signs.

I used the vinyl cutter to cut out some sayings, brought a set of stencils, paints, painter’s tape, brushes, sanding block, sander, and anything else I thought we might use.

Each lady chose a canvas and set off on their project.

First, several of us whitewashed our boards.

The steps are easy.  Remove the letters from the vinyl and keep the part that you removed the letters from.  Lay the vinyl on the wood, make sure to press it all down really well.


 Lightly apply paint  to the spaces.


Allow the paint to set for a little bit the gently peel off the vinyl. You will end up with a picture or saying.


One of our friends decided to paint a picture on her canvas.  Wow! 


It was a fun, rainy night.  You will see my “Kiss me” picture in our new place.  It still needs some work to be done,

It was a fun night.

Chalkboard DIY, Coldspring, Country Style, Curbside rescue, reclaimed wood, recycled furniture, The Garagemahal

Making a Standing Chalkboard

We are clearing out the Garagemahal as we prepare to put our beloved Star Hill on the market. I am getting pressure from Mr. Math to get rid of the hoard. My collection of odd bits and parts, Doo dads, rusty metal, and miscellaneous hardware needs a new home. Mr. Math would be fine with the new home being the trash.

Not this girl.

Saturday morning I stood in the hoard and started looking at what I had to work with. I decided to make a standing chalkboard/ message board. (They need a better name and I am open for suggestions.) In fact while I was at it, I figured I may as well make six of them for the ladies at craft night.

I pulled out a set ls spindles from a table the social planner and I got off the road one day. It was a wreck when we got it but the spindles were solid wood so I saved them.

2015/02/img_2438.jpg

I pulled out my stash of hardware. I have quite a collection of odd handles, knobs and bits. Some of them I buy for pennies at thrift stores, garage sales, or ReStore but most come off pieces I redo and change the look.

I had a can of spray chalkboard paint in the cabinet. I have to admit that the spray chalkboard paint is not my favorite, but it works.

I grabbed two sections of 1X12 pine board that were shelves an a section of 1X1 moulding and a 2X6 board for the project.

supplies 1-IMG_0127

My sweet husband cut all the spindles down to the same size and then used the drill press to put a hole in the center of each top for a screw to go in.

I played with the parts until I came up with a plan.

I cut the pine board, the 1X1 moulding, and the 2X6 into 6 inch segments each.

connecting board

pine boards

The assembly process took both Mr. Math and me working. The steps were to connect the spindle to the 2X6 with wood glue and a screw, then connect the 1X1 to the other end of the spindle with a screw in the center.

1-IMG_0138 1-IMG_0136 1-IMG_0137

Two screws at each end of the 1×1 went into the 1 inch width of the 6 inch section of the 1X12,

A little wood glue, wood filler, and a quick spray of primer unified the four sections.

1-IMG_0140 1-IMG_0141

The whole thing got primed, painted with sea salt, then heavily distressed and glazed.

1-IMG_0142

1-IMG_0146 1-IMG_0147

I then taped off a chalkboard rectangle on each board then spayed them.

1-IMG_0152-001

While the chalkboards were drying, my friend the social planner helped me pick out some of the hardware and knobs to attach to the pieces.

1-IMG_0153

Do you remember the roadside end table? The handle from that piece made it onto a piece here.

20140615-141529-51329339.jpg

20140615-173740-63460586.jpg

So did some hardware from my windfall.

funky dresser hardware

Once the chalkboard was dry we attached the hardware to each piece and the social planner attached a clip with E6000 in case someone wanted to use it for invitations or photos.

Here they are ready for the party.

1-IMG_0158 1-IMG_0164 1-IMG_0166

The cost of this entire project was what I spent in screws, wood glue and paint. I am estimating I spent $10.00 total in supplies I will have to replenish.

These would be great table numbers at a wedding or on a buffet table  Here they are lined up for craft night.

1-IMG_0174

It was nice to see the craft group enjoying their surprise.

1-IMG_0186

When the ladies came in they got to put a tag on their chalkboard.  It was fun to see the different ones each chose.

Well, what do you think?

I love hearing from you,

Blessings,

Karen

Curbside rescue, Dresser, Repurposed Furniture, Roadside Rescue

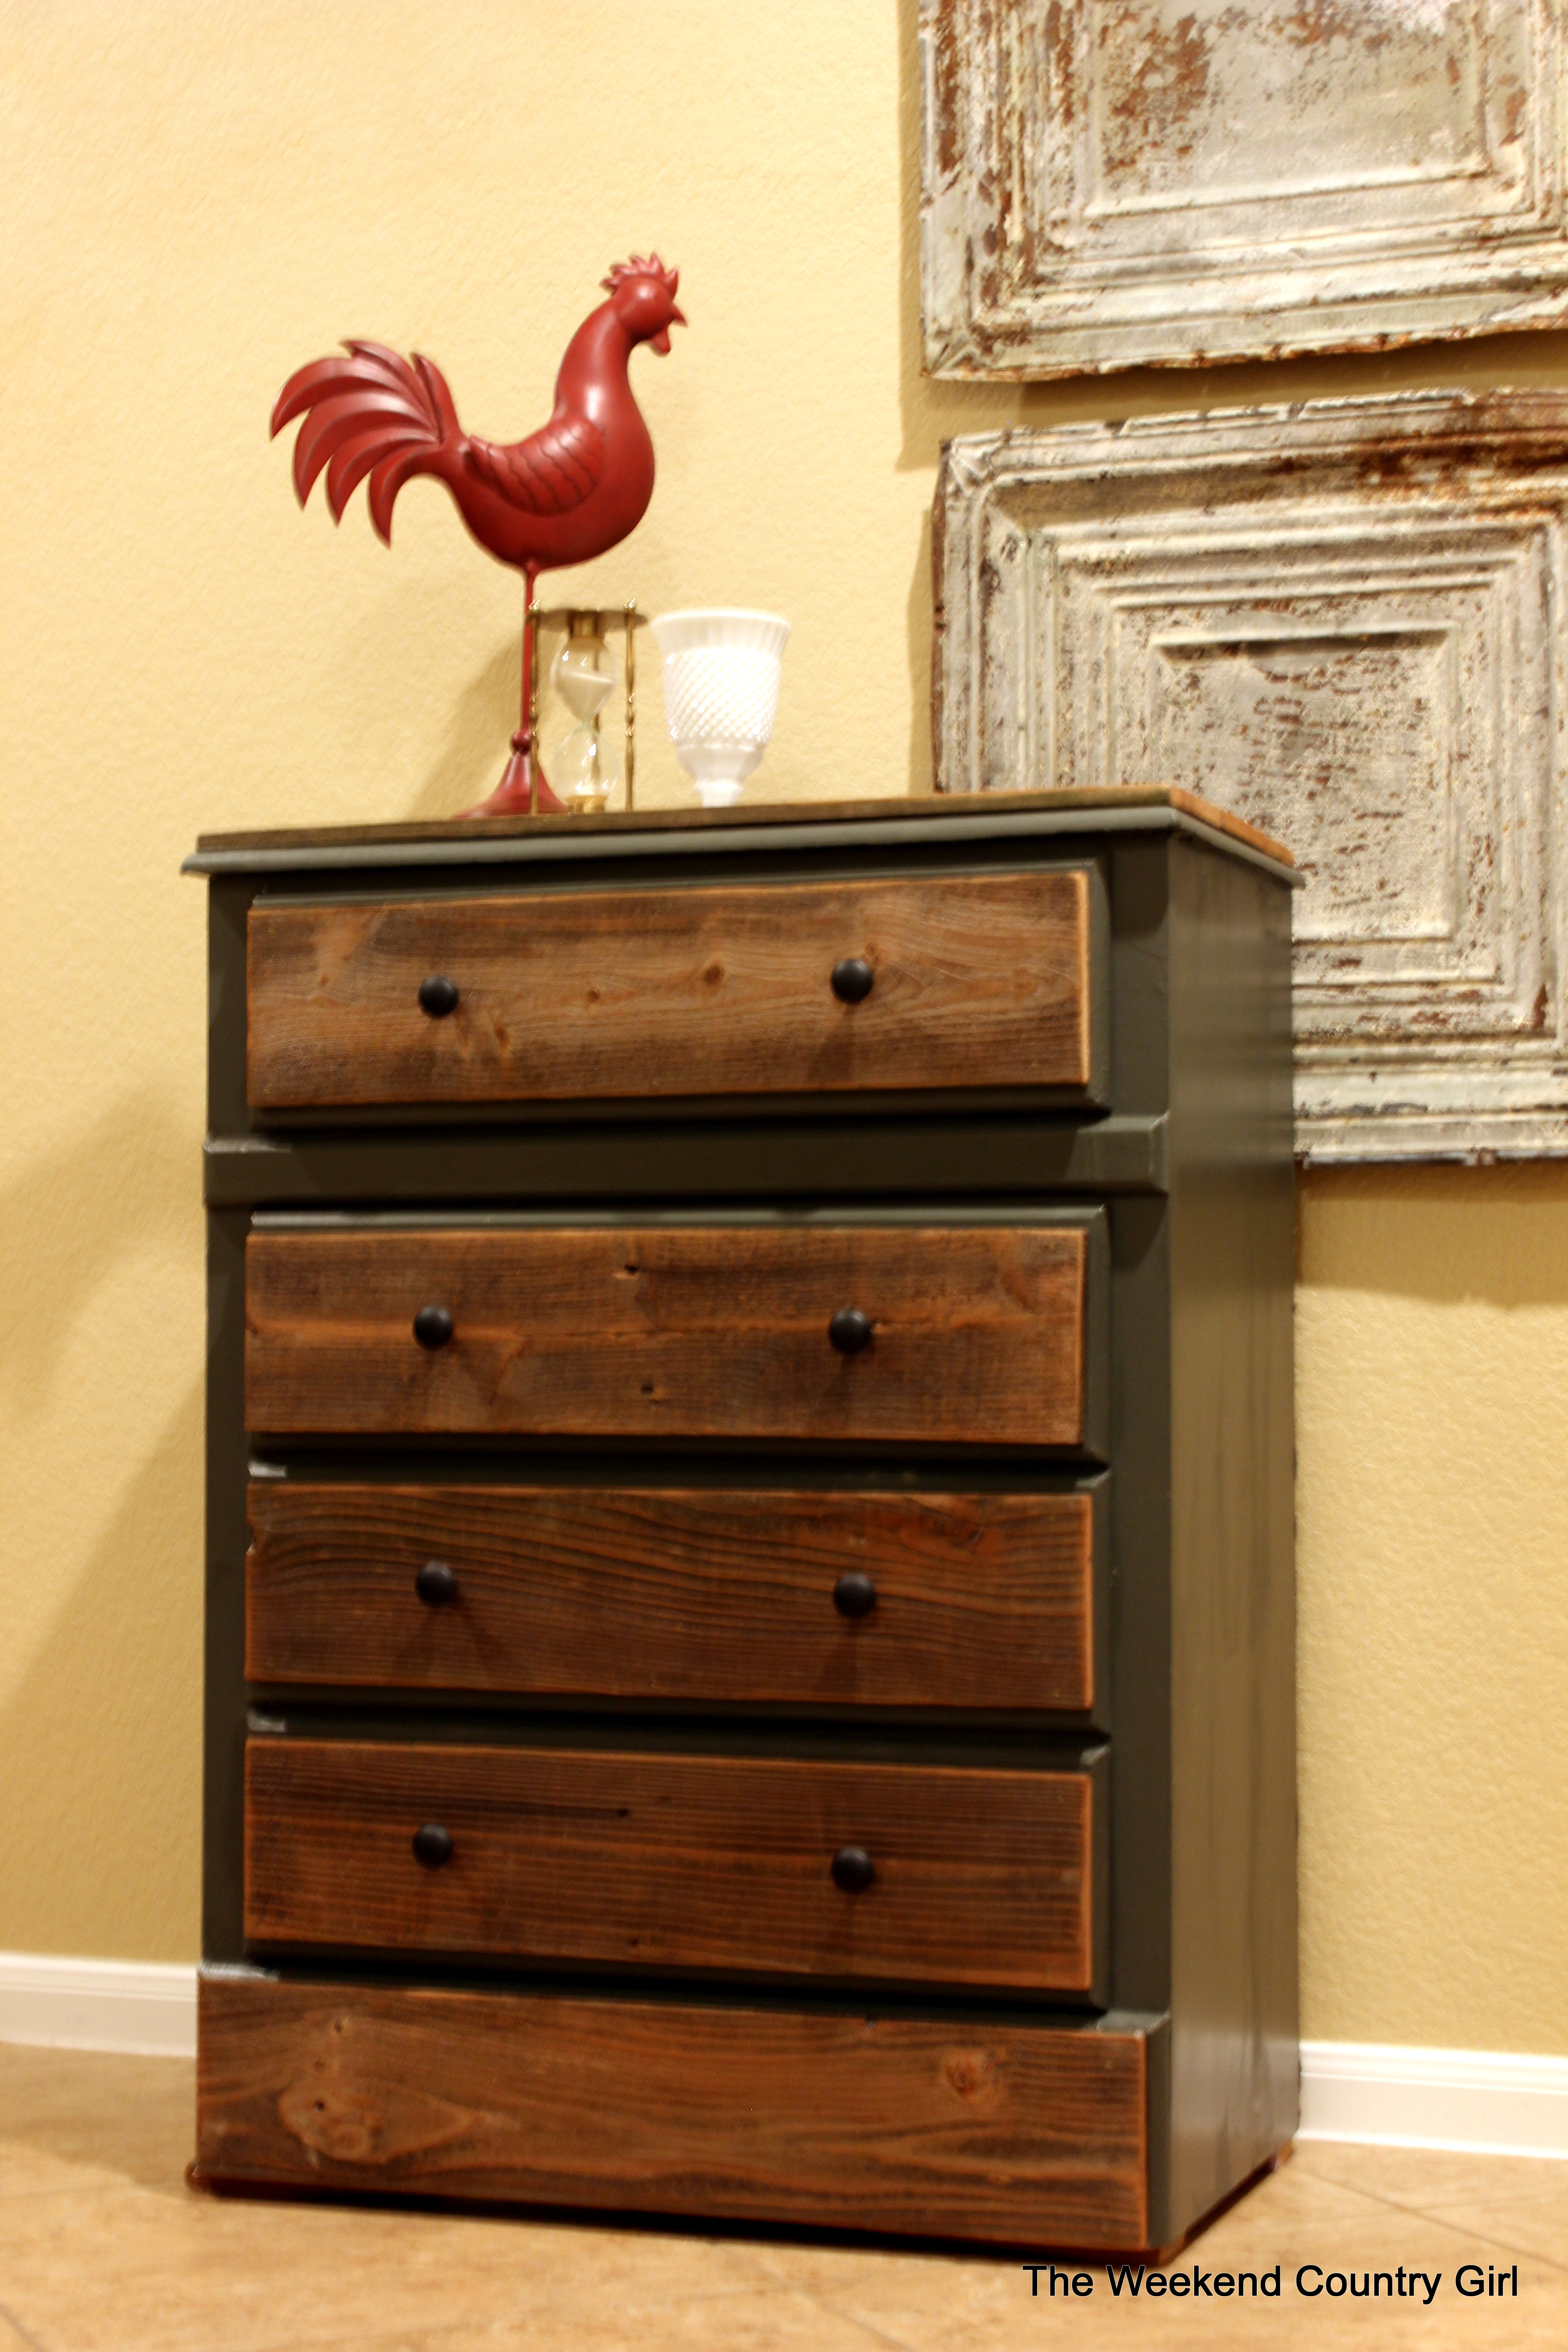
Roadside Repurposed Dresser

We found this beauty sitting on the side of the road outside a rental house.  There wasn’t much I loved about the piece except that it had some great French Provincial hardware hiding under layers of paint but I just couldn’t leave it sitting on the curb waiting for heavy trash pick up.

2015/01/img_2406.jpg

We stopped and got the dresser along with this piece I am still thinking about what to do with it but I am thinking gray and creamy white.
2015/01/img_2271.png

After a month of the ugly lavender dresser sitting in our garage I decided that this was the weekend to get busy and do something with the piece. Because the piece was not real wood and had some areas that the fake wood had gotten wet and was swollen, I knew it would need a lot of sealing.  First it all got primed with Zinzer primer then I made my own version of chalk paint for the second coat out of a grayish, greenish OOPS paint sitting in the garage that I thought would work for the piece. Here is a trick if you like the look and feel of latex paint with poly on top for durability but like the way that chalk paint will cover nasty surfaces, use one coat of chalk paint then sand lightly, then paint over it with the latex paint.

1-IMG_9985

After painting the whole piece I could see it still needed additional help.
I decided  to take the dresser in a whole different direction.

1-IMG_9987

1-IMG_9984

I took off the French Provincial hardware and added cedar fencing we picked up when our neighbors changed out their fence.  One board covered the front of each dresser drawer, one to cover the bottom part and three to cover the top.  Only one board needed to be cut down narrower on the table saw. After the boards were nailed on, I gave them a good sanding to bring out the color of the wood.

1-IMG_9986

The hardware I decided to use out of my hoard was some shiny brass hardware that had been given to me by a neighbor. A coat of Rustoelum Flat spray paint designed for metal was just the ticket to getting the look I wanted. My math-minded husband figured out where the pulls needed to go on the dresser and drilled the holes so that they would line up vertically.

2015/01/img_2407.png

2015/01/img_2408.png

Here he is in all his glory. No one would guess that this dresser was a cheap, feminine, not wood dresser headed for a landfill.

1-IMG_0002 1-IMG_0003 1-IMG_0006 1-IMG_0008 1-IMG_9999

It is going to be a gift for a hard-working friend.

What do you think about the finished $2.00 project?

I would love to hear from you.

Blessings,

Karen

Curbside rescue, Dresser, home decorating, Roadside Rescue, Rubbish Rescue, Thrifting

Burn Pile Barn Door

Today I am going to show you the amazing barn door I made from wood that was destined for the burn pile.

close up of barn door

I have an odd obsession with things saved from the trash.

I own (or it owns me depending who you talk to) a rescue dog.

lumi nose

I cheer every year when this rose blooms because Mr. Math mowed over it twice trying to get rid of it before giving up and leaving it alone.

hardy rose

I have saved several pieces of furniture from the trash or the burn pile. They are some of my favorite projects.

the finished vanity


Burn Pile Vanity

roadside credenza


Roadside Credenza

Finished Mudroom Bench


Mudroom Bench

My dad, the original junker in our family, had some cedar cut on his property on “halves “. Basically that means he got half of the wood and the person who cut it into lumber got half for payment. Some of the cedar had imperfections that went into the cull pile. It was wormy , or bowed or split.

cedar lumber


Cedar Windfall

My dad saved that wood for me. He knew I would want it. My dad knows me well, I did. There was a lot more wood than I expected , and it has been consuming almost a third of the Garagemahal for almost a year drying. I wasn’t sure what this wood would become but I knew that one day I would find a home for it.

I found a home for some when The Social Planner’s son bought a FEMA trailer that he and his dad are gutting and turning into a cool home for this single guy who works on yachts in a very expensive bayside community.

fema trailer turned to solar powered rv dubbed emergency response studio 14   From FEMA Trailer to Solar Powered Studio and Home

You might check out what people are doing with these trailers online.  They were filled with formaldehyde when they were built for families after the hurricane decimated New Orleans and were dumped by the government as soon as possible.   You can pick one up for a couple of thousand dollars now but they need all the junk on the inside removed.

The look he is going for is rustic industrial. I can’t wait to get some shots of the inside.  Right now the kitchen is done but everything else is under construction.

We made the door quickly out of some of the cedar.

First we sorted out the wood and put it out on the floor to look at and move around then cut them all to length.

cedar door cedar planks sawdust cedar boards


Next we clamped the wood and added a board at the top, bottom and across diagonally to make a Z.

clamped cedar barn door

z barn door


Here it is finished.  The door has five coats of polyurethane on all the door and seven inside the crevices.

the finished barn door close up of the door close up of barn door

It is going to look amazing in the trailer along with this piece that is going to be a counter once it is coated with bar coating.

cedar counter

I hope you all had a wonderful weekend.

Thank you for reading my blog.  I appreciate hearing from you.


Blessings,

Karen

Curbside rescue, glazing, Lake Livingston, reclaimed wood, Repurposed Furniture

1970’s End Table Makeover

A coworker picked up this end table on the side of the road. When she offered it to me, of course I took it but I didn’t need it for our home.

20140615-141529-51329339.jpg

A couple of times a year I offer up free stuff to my Facebook friends. When I posted this, Vicky,who is married into the same crazy family as I am, said she wanted it.

20140615-141524-51324542.jpg

Then she threw me a curve ball. She wanted it for her son’s room that is decorated in camouflage.

I took hubby shopping for paint. Because this table is made of questionable materials, I wanted to spray paint it with a paint and primer. He picked this color for the camo room.

20140615-142831-52111058.jpg
After deglossing with liquid sand, I sprayed it quickly with the spray paint. Hubby helped me cut reclaimed cedar planks for the top. I thought that might toughen up the look of the ornate end table.
I tried not to bug him too much this weekend but he volunteered. He also used the router to round over the edges. It makes the transition between the reclaimed wood and the table not seem so abrupt.

20140615-172533-62733996.jpg

20140615-172529-62729488.jpg
I distressed it a little and glazed it a tea stain color to make it look older.
And put 6 coats of poly on the top. Poly, dry, steel wool repeat.
Here it is ready for action. I like the single knob better than the fussy pull on the faux drawer.

What do you think about it?

20140615-173607-63367107.jpg

20140615-173602-63362046.jpg

20140615-173740-63460586.jpg

20140615-173736-63456871.jpg

20140615-173813-63493499.jpg

cedar lumber, Curbside rescue, DIY Furniture, milk glass, reclaimed wood, Rubbish Rescue, Style, the suburban home

Bathroom Shelf DIY

When I started thinking about redoing the master bath I found this awesome picture.

20140511-174749.jpg
I wish I had saved the location I found this. I have checked my Pinterest boards and done an image search with no luck. If you find where it came from, please let me know and I will gladly credit it to the source.

Annnnywayyy… I loved the rustic look and knew it would be great in our very builder basic bathroom.

20140511-175332.jpg
This is a photo of our home when we were looking at it to purchase. The great piece of furniture did not stay with the house. It is just a very boring sage green space.

As luck would have it, my junker collector mom picked up a small section of fencing for me. It was the perfect size! I wanted thicker shelves on mine so I modified the design above to make it more what I wanted.

I decided I could take this on all on my own. I am trying to do more work on my own so that my Hubby has time to do what he loves. I did not end up having the skills I needed.

He did have to help me connect the air nailer (I tried, but that bugger wouldn’t go in), he put in the screws for the 2X4’s, he ripped the front boards on the table saw because it scares me, and he volunteered to move chop saw for me.

Thanks, Hubby.

The steps are simple.

Cut three 2X4’s about a half inch narrower than the width of the section of fencing.

Figure out where you want the shelves to go, then screw the 2X4 in from the back side of the fencing section so that the wide part of the 2X4 sticks out from the fencing.

Cut 5 sections of fencing planks to length.
3- the length of the 2X4 plus the additional length to go to the edge of the siding

2- small sections to cover the ends

20140511-184636.jpg
Hubby ripped one board length in half with the table saw to make the shelf more narrow.

I air nailed them together pretty quickly.

20140511-182457.jpg
Here it was when finished.

See the tops of the fence pickets? I liked them, but our rescue dog, Lumi, did not. She chewed one of the pickets off while we weren’t watching. It had to be chopped off even. I like the result even better, but don’t tell Lumi. She was in big trouble.

Here it is, hanging in the bathroom.
I love the results.

20140511-183710.jpg

20140511-183736.jpg

20140511-183807.jpg

<

20140511-183834.jpg

20140511-183850.jpg

20140511-183906.jpg

I hope I can learn to to more on my own.

Let me know what you think,

Have a great day.

Blessings,

Karen

Behr Paint with Primer, crafting, Curbside rescue, Decorating

Ways to Repurpose a Cabinet Door

Cabinet doors are easy to find and can be purchased for a song. If you know someone who is getting a new kitchen, ask for the doors. I did when my neighbor, Shahana tore out a section of her cabinets and ended up with several doors and drawers. That is way better than them ending up in a landfill. Our local ReStore sells doors for between a dollar and two dollars a door. They are already cut and sanded to size, often have moulding and interesting shapes on them and are a great item to jump in to the repurposing game.

Here are a few unique cabinet door repurposers. These folks have skills. These folks have imagination. These folk make me jealous.

South of Main
Turning a cabinet door into a sentimental tray on a stand.

Repurposed Cabinet Door Shabby Chic Teal Chalk Board with white flower knobs

Trisha’s Dandelion
This cabinet door had me at teal.

Dukes and Duchesses
This site has 10 different ways to repurpose a cabinet door.

Cabinet Door Easel

House on Harrison
An Easel. What a great idea.

Spring door decor, large chevron wood letter for front door

Bless Her Heart Designs

What a great idea to use a door as a door decoration!

I have used a cabinet door to make a tray, a shelf and several chalkboards, but this is my favorite. It was a gift to my friend, The Social Planner.

Art from an Old Door Knob

Art from a door knob.

Sooo…on to my new cabinet door project:

I am feeling the need for spring, and I wanted to try out a new green color before I went crazy on the drink station for Team Dean so I purchased a sample container of paint and decided to try it out for a coat rack.  This is Behr Asparagus.


I bought the metal coat rack a while back at Hobby Lobby for 1/2 price and have been holding on to it.

The inspiration for this coat rack came from my visit to Facelift Furniture.  Jeff does the coolest coat racks ever and I love the vibrant colors.
Facelift Showroom

Facelift Showroom 2

My project seriously took about 30 minutes total of work time, but I did it over a few nights so that the paint could dry.

I filled the hole where the cabinet knob had been, sanded the wood fill, then primed that spot.

Then I painted the entire front of the cabinet door with two coats of paint. Then the back with one coat because it was ugly.
IMG_6032

IMG_6034

I spray painted the screws flat black so they would not stand out.

A coat of polyurethane to seal the paint.

Finally, I attached the metal coat rack to the door and a hanger on the back.  Tah Dah!

What a quick and easy way to add a splash of color to a room that is not permanent.

The blue is from mistint oops pike and the birds were on the wall in our laundry room when we moved in. I don’t love it but I like it and for a fifty cent investment not too bad.

20140224-173959.jpg

20140224-173951.jpg

IMG_6078

IMG_6079

IMG_6080

IMG_6081
The colors are terrible in the last two photos. Rainy outside, bad light inside. Sorry. I will take them out the next sunny day and update this post.

Behr Paint with Primer, Blogging, Building a Home, Chalkboard DIY, Coldspring, Country living, Country Style, Curbside rescue, Decorating, Dining Table, DIY Painting and Glazing Furniture, DIY Projects, Dresser, French Provincial, Lake Livingston, resale finds, reusing an old frame, Roadside Finds, Thrifty Art, wedding, Weddings

10 of My Favorite Posts and a Big Thank You!

If things go as they have been for the last week, by the time I wake up tomorrow I will have had 50,000 page views on my little teeny tiny minnow of a blog. I will also be celebrating two years of blogging. There are blogs out there that get 50,000 page views a day and it has taken me two years.  I never said I was fast.  first and foremost, I want to say thank you, friends, for reading, thank you for commenting, and thank you for causing me to improve what I produce. I still have no idea what I am doing most of the time. By that I mean my husband and I are making it up as we go on our projects, and sometimes failing miserably. I am about the most technology challenged blogger out there. There have been many times when I did something on the blog but had no idea what I did, how to fix it, or if it was good, how to repeat that good thing. Between the time I started this blog and now both our children have married, my husband and I changed jobs, we sold a home, went a while “between homes”, bought a home and moved to a new city, my son and daughter in law have moved in part-time, I started a new blog called My Burb Home, and I have taken up photography as a hobby. Not bad for two folks in their 50’s.

This next year we plan to travel to two places on our bucket list, work on both our weekend home and our suburban home, build a raised garden, put in a fire pit,and continue to work on found furniture.  Life is good for this weekend loving couple.

I wanted to share with you some projects from the last two years.  As I looked back, there were others that could have or should have made the cut but I plan on rewriting several of them now that I don’t stink like when I started. Not many of you were around when I first logged in, set up an account and started rambling so some of the projects below may be new to you. Just click on the hyperlink and it will take you to the original blog.  I hope you enjoy.

10. French provincial furniture makeover.  I love that we were able to take a couple of homely particle board pieces of furniture and make them beautiful. I am seriously considering selling this set because I want to redo the room like now I recently saw on a home tour but I love the color combination and how much I learned on this project.

French Provincial Dresser

9. Western Dresser.  We found a homely little Goodwill dresser and made it something fun for the lake house guest room we call the bunk room.
western dresser

8. Table and Banquette seating out of reclaimed wood.  Wow! This is one of my oldest posts and my dinky little camera did not do this beauty any justice.  I will be re-photographing this set.  This was a collaboration between Hubby and me to come up with a solution to a tiny space using reclaimed siding from our house.  It is one of the most functional spaces in our home now.

Making Room for a Dining Area at Star Hill

7.  Farmhouse Table.  I love the look of a rustic table but man, they are expensive. Our $90.00 solution to this problem turned out to be one of my favorite pieces of furniture. It moved with us and was where we gathered for our first Thanksgiving meal in the new home.

farmhouse table

6.  Wedding Chalkboard.  I did tell you my kids got married, right?  I was fortunate enough that both my daughter and daughter in law wanted me to make personal items for their wedding.   I loved that they wanted things that I worked on as a part of their special day.  The link above is one of those items, an ornate frame my daughter in law, Sweet Amanda, found at a resale shop that I redid for the wedding and added a chalkboard.  I chose this one because it was the first wedding project. I love all four of my precious kids.

DIY Framed Chalkboard

5.  Map Chair.  Another piece of furniture that needs to be re-photographed.  This little chair would be easy to recreate for a friend moving to a new city or a college student who needs to remember where home is. I seem to have a thing for chairs.

Map Chair Seat

4.  Painted Suitcases.  I have made a total of seven of these painted suitcases now  The link is to four of them I did at one time.  I love finding cheap old hard sided suitcases, priming, painting, distressing, glazing then adding a chalkboard to one side.  It makes a great entry into a home when guests are coming over or to announce an event. If I ever started a business, I would sell these because I enjoy mine so much.

Chalkboard Suitcase

3.  Junk Fairy End Table.  The last three are easy.  They are my favorite, favorite projects.  They speak to my love of color, family and friends.  The junk fairy ( AKA The Social Planner) dropped off this homely table while we were gone one day. I did not need it, so posted a photo of it on Facebook and offered to redo it for a friend. Robin snagged it. I am happy that she chose green as the color for the table. I really like how the stained top turned out. I enjoyed it so much that I painted a table in my own home close to the same colors.
The finished green end table

2.  Beverage Station.  I am now working on number three of these babies. What a great re-purpose project for an old stainless sink and a sewing machine cabinet. I love the look and they make entertaining in a back yard or porch more inviting. My favorite blue color, Behr sailboat blue, got used here. My long-suffering husband gets major credit for the stainless sink idea here.
drink station
1.  Mudroom Bench.  When we moved this year I literally looked for homes that my mudroom bench would fit in. It is by far my most favorite project to date. I look forward to the day that someone sends me a photo of their version of the project.&nbsphttp://theweekendcountrygirl.com/2013/01/28/toilet-paper-roll-art/; A found dresser, waiting for heavy trash pickup, and a resale shop mirror turned into this beauty.
mudroom bench

I hope you enjoyed my little walk down memory lane. Thank you for taking the time to look back on my last two years. Thank you for allowing me to share what we do.

Curbside rescue, home decorating, master bedroom, new home, Painted Furniture, Repurposed Furniture, rescuing damaged furniture, Roadside Finds, The bedroom, Thrifty decorating, upholstery

A Bench for the Foot of the Bed

20130921-130544.jpg

This project has been a long time in the works. A year ago, before I even considered moving to the burbs, I literally picked up these legs out of the trash at a garage sale. (I did ask first.) They once were legs for a side table and were solid wood.

I did not have a plan for them but they were too nice to be trashed.

table legs

When we moved into our new house I knew I would want a bench at the end of our bed. The room is big and I love having a place to sit and put on shoes in the bedroom. I stalled on completing this project because I am trying to keep the cost down in decorating our room. I am way over budget in the den and guest room. (Like double my $100.00 per room budget in both rooms.) Before starting the bench I had spent about $80.00 on the master bedroom and I still have a few things to do. The holdup was upholstery foam. It is expensive. Crazy expensive. The foam for the mudroom bench tufted cushion was $32.00. A friend of my daughter told me she bought foam on Amazon, but it was still going to be $20.00 with shipping.

A trip to Ikea solved the problem. Have you ever been in the “As is” section of an Ikea? It is a great place to find what you didn’t even know you were looking for. Table legs, cabinet doors, scratch and dent furnishings, hardware…the place is fun to look around in for the unexpected. I found a huge cushion for a couch or chair marked $5.00. Plenty big enough for my bench.

20130920-170810.jpg

I sliced the thickness of the foam in half using an electric knife then used spray adhesive to attach it to a scrap of plywood pulled from the hoard and cut to fit, added a layer of batting then wrapped an old sheet around the foam and attached it to the plywood with my staple gun. This step keeps the foam in place and smooth while the upholstery is being attached. It has been so long on this project that I could not find a photo of the cushion or the big slice job. I will keep looking.

upholstery diy

In order above: sheet on bottom, then a layer of batting, then foam, then plywood

upholstered bench

use a sheet to line upholstery

Hubby built a frame for the bench base and attached the legs with thumb screws. The frame and legs got painted a couple coats of Behr Revival Mahogany.

20130921-144035.jpg

square corner tool

This is a cool tool. It holds the wood at a 90 degree angle so you can attach the parts.

bench frame

legs on bench

bench

Here it was while we were fitting the bench top on the base. It looks like we did not have it on evenly.

The upholstery brings a little color into the room. it was $15.00 for two yards. Well it looks like I am going to go over on this room also, but not by much. The bench ended up costing $22.00. Not bad.

bench from side table legs


repurposed end table legs


teal bench

I love how this looks.

teal paisley colored fabric


master bedroom with bench


teal master bedroom

I really want to paint the wall behind our bed a darker color. I believe it is going to be Garden Wall by Behr.

building a bench from table legs


master bedroom

Here she is in all her beauty. Hubby wanted some color in the room. I think this fills the bill.

Behr Paint with Primer, Curbside rescue, Painted Furniture, Repurposed Furniture, Roadside Finds, Roadside Rescue

“Franken Furniture” on the Back Porch

We have started creating an oasis on the back porch. I totally blame Sweet Amanda for the porch color scheme and Baby Boy for the name- the Skittle porch. He says that is what all the colors look like. A bag of skittles.

Here is the inspiration cushion.
20130818-180030.jpg

The turquoise chairs moved in the first day, along with the beverage station. The plants were brought over a couple of weeks ago. The new owners of our city house babysat them for us until we were able to pick them up. This weekend a project I have been very excited about made the trip from the Garagemahal to the Skittle porch.

Remember this roadside find? It was a tip from a friend that led us out in the rain to collect this table.

This drop leaf beauty was warped and sitting in the rain, but solid wood.table roadside

IMG_2603

Remember the last roadside find from the City House? I got the coral legged end tables and also the cloven hoof coffee table. The glass was in tact and solid. I have plans for the brass feet too!

coral3

roadside

Hubby came up with a great plan to marry the two roadside finds for a table on our back porch. I am loving it. He even used left over pickets from the lake house porch makeover to make the crazy spider like legs you see under the glass. I love that the only new purchase we had to make for this entire project was the bolts that connect the top to the base. The paint is red tomato by Behr. We had this left over from the bookcase makeover at Star Hill. Here is the finished project. I love the look. It is bright but the glass makes it seem lighter and more airy. IMG_3263 IMG_3266

I love the bright colors and how the pieces fit together. The lantern is a clearance find from Marshalls.

IMG_3267

The brightly colored serving dish is one of three I got at Goodwill for $1.99 each. I will be using them a lot on the back porch.

IMG_3268 IMG_3269 IMG_3270 IMG_3271 IMG_3272

I even found a Skittle rug at Target!

IMG_3273